Les diagrammes d'état fournissent une représentation visuelle des différents états dans lesquels un système ou un objet peut se trouver, ainsi que des transitions entre ces états. Ils sont essentiels pour modéliser le comportement dynamique des systèmes, en saisissant la manière dont ils réagissent à différents événements au fil du temps. Les diagrammes d'état décrivent le cycle de vie du système, ce qui facilite la compréhension, la conception et l'optimisation de son comportement.
Utilisation de
PlantUML pour créer des diagrammes d'état offre plusieurs avantages :
- Langage basé sur le texte: Définir et visualiser rapidement les états et les transitions sans les inconvénients du dessin manuel.
- Efficacité et cohérence: Assurez une création de diagramme rationalisée et un contrôle de version facile.
- Polyvalence: S'intègre à diverses plates-formes de documentation et prend en charge plusieurs formats de sortie.
- Open-Source & Community Support: Soutenu par une communauté solide qui contribue continuellement à ses améliorations et offre des ressources inestimables.
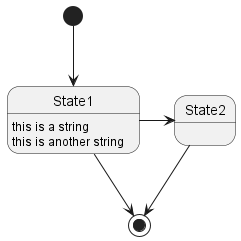
Vous devez utiliser
[*] pour le début et la fin du diagramme d'état.
Utilisez
--> pour les flèches.
🎉 Copied! 
 | @startuml
[*] --> State1
State1 --> [*]
State1 : this is a string
State1 : this is another string
State1 -> State2
State2 --> [*]
@enduml
|
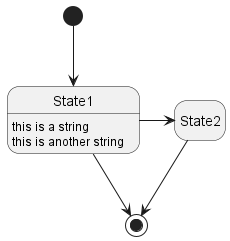
Il est possible d'utiliser la directive
hide empty description pour afficher l'état de façon plus compact.
🎉 Copied!
| @startuml
hide empty description
[*] --> State1
State1 --> [*]
State1 : this is a string
State1 : this is another string
State1 -> State2
State2 --> [*]
@enduml
|
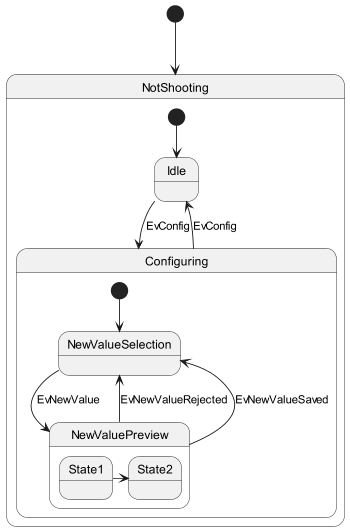
Un état peut également être composite. Vous devez alors le définir avec le mot-clé
state et des accolades.
Sous-état interne
🎉 Copied!
| @startuml
scale 350 width
[*] --> NotShooting
state NotShooting {
[*] --> Idle
Idle --> Configuring : EvConfig
Configuring --> Idle : EvConfig
}
state Configuring {
[*] --> NewValueSelection
NewValueSelection --> NewValuePreview : EvNewValue
NewValuePreview --> NewValueSelection : EvNewValueRejected
NewValuePreview --> NewValueSelection : EvNewValueSaved
state NewValuePreview {
State1 -> State2
}
}
@enduml
|
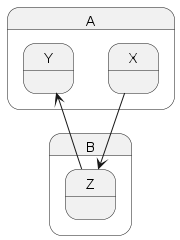
Lien entre sous-états
🎉 Copied!
| @startuml
state A {
state X {
}
state Y {
}
}
state B {
state Z {
}
}
X --> Z
Z --> Y
@enduml
|
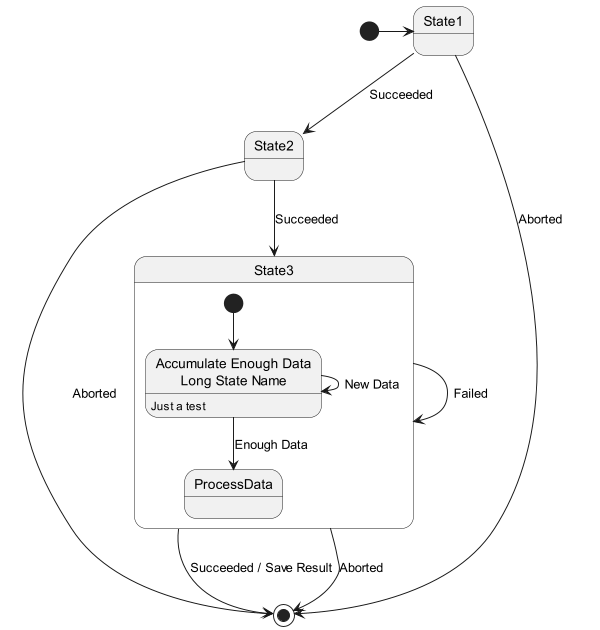
[Ref. QA-3300] Vous pouvez aussi utiliser le mot-clé
state pour donner un nom avec des espaces à un état.
🎉 Copied!
| @startuml
scale 600 width
[*] -> State1
State1 --> State2 : Succeeded
State1 --> [*] : Aborted
State2 --> State3 : Succeeded
State2 --> [*] : Aborted
state State3 {
state "Accumulate Enough Data\nLong State Name" as long1
long1 : Just a test
[*] --> long1
long1 --> long1 : New Data
long1 --> ProcessData : Enough Data
}
State3 --> State3 : Failed
State3 --> [*] : Succeeded / Save Result
State3 --> [*] : Aborted
@enduml
|
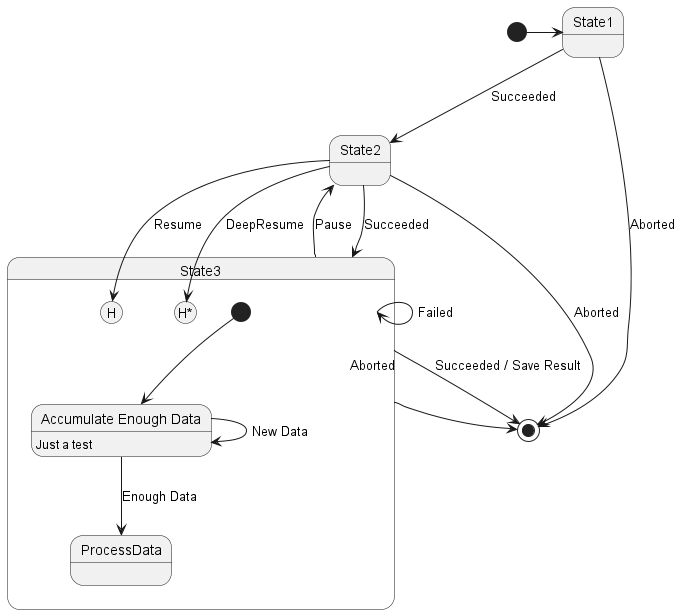
Vous pouvez utiliser
[H] pour l'historique et
[H*] pour l'historique profond d'un sous-état.
🎉 Copied!
| @startuml
[*] -> State1
State1 --> State2 : Succeeded
State1 --> [*] : Aborted
State2 --> State3 : Succeeded
State2 --> [*] : Aborted
state State3 {
state "Accumulate Enough Data" as long1
long1 : Just a test
[*] --> long1
long1 --> long1 : New Data
long1 --> ProcessData : Enough Data
State2 --> [H]: Resume
}
State3 --> State2 : Pause
State2 --> State3[H*]: DeepResume
State3 --> State3 : Failed
State3 --> [*] : Succeeded / Save Result
State3 --> [*] : Aborted
@enduml
|
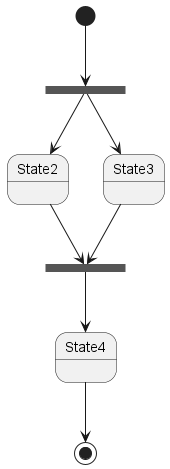
Il est possible d'afficher des états parallèles grâce aux stéréotypes
<<fork>> et
<<join>>.
🎉 Copied!
| @startuml
state fork_state <<fork>>
[*] --> fork_state
fork_state --> State2
fork_state --> State3
state join_state <<join>>
State2 --> join_state
State3 --> join_state
join_state --> State4
State4 --> [*]
@enduml
|
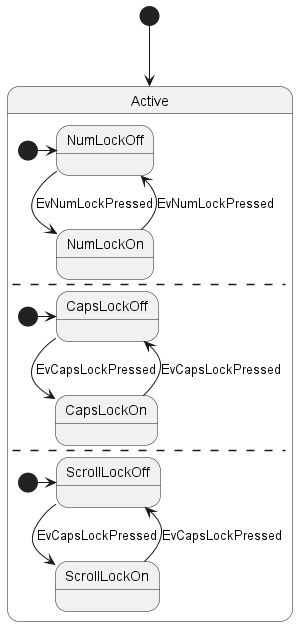
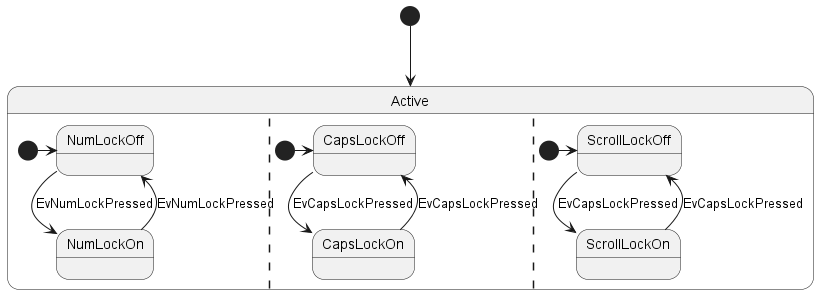
Vous pouvez définir un état concurrent dans un état composé en utilisant le symbole
-- ou
|| comme séparateur.
Séparateur horizontal --
🎉 Copied!
| @startuml
[*] --> Active
state Active {
[*] -> NumLockOff
NumLockOff --> NumLockOn : EvNumLockPressed
NumLockOn --> NumLockOff : EvNumLockPressed
--
[*] -> CapsLockOff
CapsLockOff --> CapsLockOn : EvCapsLockPressed
CapsLockOn --> CapsLockOff : EvCapsLockPressed
--
[*] -> ScrollLockOff
ScrollLockOff --> ScrollLockOn : EvCapsLockPressed
ScrollLockOn --> ScrollLockOff : EvCapsLockPressed
}
@enduml
|
Séparateur vertical ||
🎉 Copied!
| @startuml
[*] --> Active
state Active {
[*] -> NumLockOff
NumLockOff --> NumLockOn : EvNumLockPressed
NumLockOn --> NumLockOff : EvNumLockPressed
||
[*] -> CapsLockOff
CapsLockOff --> CapsLockOn : EvCapsLockPressed
CapsLockOn --> CapsLockOff : EvCapsLockPressed
||
[*] -> ScrollLockOff
ScrollLockOff --> ScrollLockOn : EvCapsLockPressed
ScrollLockOn --> ScrollLockOff : EvCapsLockPressed
}
@enduml
|
[Ref. QA-3086]WARNING
This translation need to be updated. WARNING
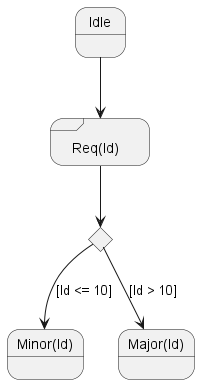
Le stéréotype
<<choice>> peut être utilisé pour signifier des états conditionnels.
🎉 Copied!
| @startuml
state "Req(Id)" as ReqId <<sdlreceive>>
state "Minor(Id)" as MinorId
state "Major(Id)" as MajorId
state c <<choice>>
Idle --> ReqId
ReqId --> c
c --> MinorId : [Id <= 10]
c --> MajorId : [Id > 10]
@enduml
|
🎉 Copied!
| @startuml
state choice1 <<choice>>
state fork1 <<fork>>
state join2 <<join>>
state end3 <<end>>
[*] --> choice1 : de ""start""\nà ""choice""
choice1 --> fork1 : de ""choice""\nà ""fork""
choice1 --> join2 : de ""choice""\nà ""join""
choice1 --> end3 : de ""choice""\nà ""end""
fork1 ---> State1 : de ""fork""\nà ""state""
fork1 --> State2 : de ""fork""\nà ""state""
State2 --> join2 : de ""state""\nà ""join""
State1 --> [*] : de ""state""\nà ""end""
join2 --> [*] : de ""join""\nà ""end""
@enduml
|
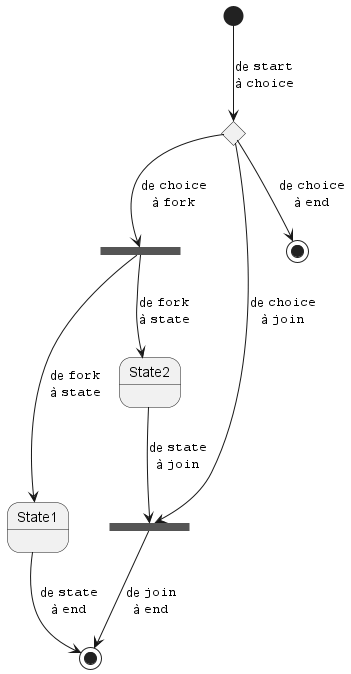
[Réf. QA-404 et QA-1159][Ref. QA-404, QA-1159 and GH-887]WARNING
This translation need to be updated. WARNING
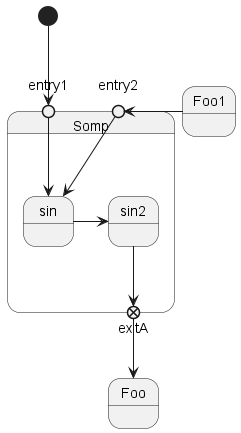
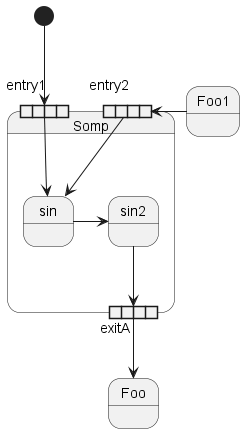
Vous pouvez ajouter de petits cercles
[point] avec les stéréotypes
<<entryPoint>> et
<<exitPoint>> :
🎉 Copied!
| @startuml
state Somp {
state entry1 <<entryPoint>>
state entry2 <<entryPoint>>
state sin
entry1 --> sin
entry2 -> sin
sin -> sin2
sin2 --> exitA <<exitPoint>>
}
[*] --> entry1
exitA --> Foo
Foo1 -> entry2
@enduml
|
WARNING
This translation need to be updated. WARNING
Vous pouvez ajouter de petits carrés
[pin] avec les stéréotypes
<<inputPin>> et
<<outputPin>> :
🎉 Copied!
| @startuml
state Somp {
state entry1 <<inputPin>>
state entry2 <<inputPin>>
state sin
entry1 --> sin
entry2 -> sin
sin -> sin2
sin2 --> exitA <<outputPin>>
}
[*] --> entry1
exitA --> Foo
Foo1 -> entry2
@enduml
|
[Réf. QA-4309]WARNING
This translation need to be updated. WARNING
Vous pouvez ajouter de multiples petits carrés
[expansion] avec les stéréotypes
<<expansionInput>> et
<<expansionOutput>> :
🎉 Copied!
| @startuml
state Somp {
state entry1 <<expansionInput>>
state entry2 <<expansionInput>>
state sin
entry1 --> sin
entry2 -> sin
sin -> sin2
sin2 --> exitA <<expansionOutput>>
}
[*] --> entry1
exitA --> Foo
Foo1 -> entry2
@enduml
|
[Réf. QA-4309]WARNING
This translation need to be updated. WARNING
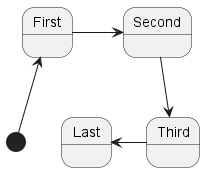
Vous pouvez utiliser
-> pour les flèches horizontales. Il est aussi possible de forcer la direction de la flèche avec la syntaxe suivante:
-down->(flèche par défaut)-right-> or ->-left->-up->
🎉 Copied!
| @startuml
[*] -up-> First
First -right-> Second
Second --> Third
Third -left-> Last
@enduml
|
Vous pouvez aussi utiliser une notation abrégée, avec soit le premier caractère de la direction (par exemple -d- à la place de -down-) ou bien les deux premiers caractères (-do-).
Veuillez noter qu'il ne faut pas abuser de cette fonction :
Graphviz donne généralement de bons résultats sans peaufinage.
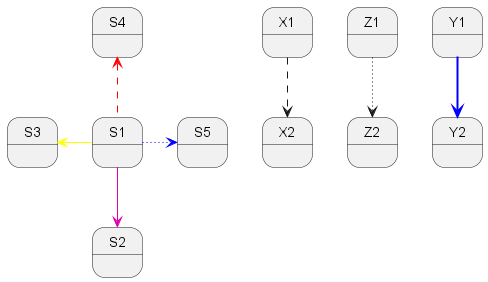
Vous pouvez modifier la
couleur et/ou le style des flèches.
🎉 Copied!
| @startuml
State S1
State S2
S1 -[#DD00AA]-> S2
S1 -left[#yellow]-> S3
S1 -up[#red,dashed]-> S4
S1 -right[dotted,#blue]-> S5
X1 -[dashed]-> X2
Z1 -[dotted]-> Z2
Y1 -[#blue,bold]-> Y2
@enduml
|
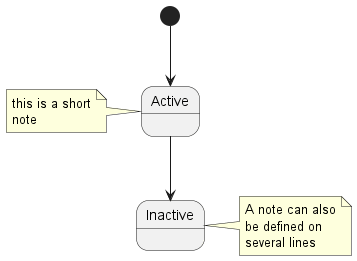
[Réf. Incubation: Change line color in state diagrams] Vous pouvez définir des notes avec les mots clés suivant:
note left of,
note right of,
note top of,
note bottom of Vous pouvez aussi définir des notes sur plusieurs lignes.
🎉 Copied!
| @startuml
[*] --> Active
Active --> Inactive
note left of Active : this is a short\nnote
note right of Inactive
A note can also
be defined on
several lines
end note
@enduml
|
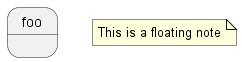
Vous pouvez aussi avoir des notes flottantes.
🎉 Copied!
| @startuml
state foo
note "This is a floating note" as N1
@enduml
|
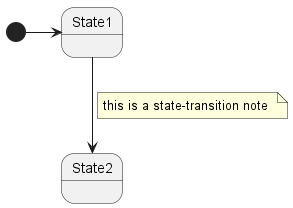
Vous pouvez ajouter une note sur un lien entre états avec le mot clé
note on link.
🎉 Copied!
| @startuml
[*] -> State1
State1 --> State2
note on link
this is a state-transition note
end note
@enduml
|
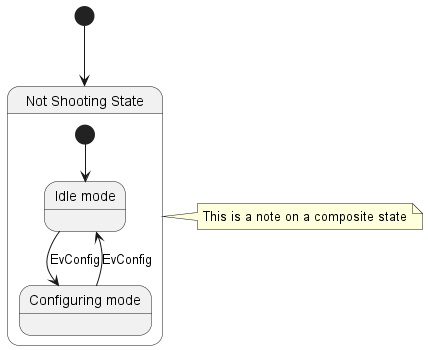
Vous pouvez mettre des notes sur les états de composite
🎉 Copied!
| @startuml
[*] --> NotShooting
state "Not Shooting State" as NotShooting {
state "Idle mode" as Idle
state "Configuring mode" as Configuring
[*] --> Idle
Idle --> Configuring : EvConfig
Configuring --> Idle : EvConfig
}
note right of NotShooting : This is a note on a composite state
@enduml
|
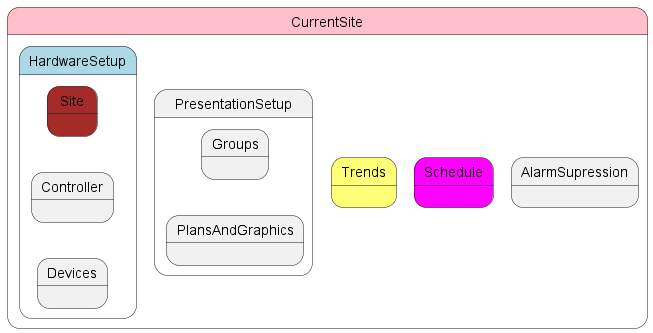
🎉 Copied!
| @startuml
state CurrentSite #pink {
state HardwareSetup #lightblue {
state Site #brown
Site -[hidden]-> Controller
Controller -[hidden]-> Devices
}
state PresentationSetup{
Groups -[hidden]-> PlansAndGraphics
}
state Trends #FFFF77
state Schedule #magenta
state AlarmSupression
}
@enduml
|
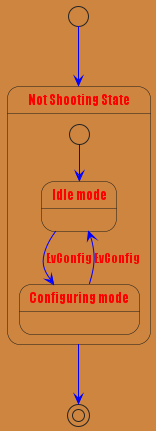
[Réf. QA-1812] Utilisez la commande
skinparam pour changer la couleur et la mise en forme du texte du schéma.
Vous pouvez utiliser cette commande :
Vous pouvez définir une couleur spécifique et une police d'écriture pour les états stéréotypés.
🎉 Copied!
| @startuml
skinparam backgroundColor LightYellow
skinparam state {
StartColor MediumBlue
EndColor Red
BackgroundColor Peru
BackgroundColor<<Warning>> Olive
BorderColor Gray
FontName Impact
}
[*] --> NotShooting
state "Not Shooting State" as NotShooting {
state "Idle mode" as Idle <<Warning>>
state "Configuring mode" as Configuring
[*] --> Idle
Idle --> Configuring : EvConfig
Configuring --> Idle : EvConfig
}
NotShooting --> [*]
@enduml
|
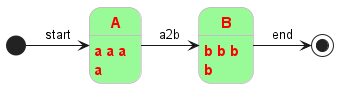
Test de tous les skinparam spécifiques aux diagrammes d'état:
🎉 Copied!
| @startuml
skinparam State {
AttributeFontColor blue
AttributeFontName serif
AttributeFontSize 9
AttributeFontStyle italic
BackgroundColor palegreen
BorderColor violet
EndColor gold
FontColor red
FontName Sanserif
FontSize 15
FontStyle bold
StartColor silver
}
state A : a a a\na
state B : b b b\nb
[*] -> A : start
A -> B : a2b
B -> [*] : end
@enduml
|
Vous pouvez changer de
style 🎉 Copied!
| @startuml
<style>
stateDiagram {
BackgroundColor Peru
'LineColor Gray
FontName Impact
FontColor Red
arrow {
FontSize 13
LineColor Blue
}
}
</style>
[*] --> NotShooting
state "Not Shooting State" as NotShooting {
state "Idle mode" as Idle <<Warning>>
state "Configuring mode" as Configuring
[*] --> Idle
Idle --> Configuring : EvConfig
Configuring --> Idle : EvConfig
}
NotShooting --> [*]
@enduml
|
*[Ref. [GH-880](https://github.com/plantuml/plantuml/issues/880#issuecomment-1022278138)]*
WARNING
This translation need to be updated. WARNING
Vous pouvez modifier la
couleur ou le style d'un état individuel en utilisant la notation suivante
Avec la couleur de fond d'abord (
#color), puis le style de ligne et la couleur de ligne (
##[style]color )
🎉 Copied!
| @startuml
state FooGradient #red-green ##00FFFF
state FooDashed #red|green ##[dashed]blue {
}
state FooDotted ##[dotted]blue {
}
state FooBold ##[bold] {
}
state Foo1 ##[dotted]green {
state inner1 ##[dotted]yellow
}
state out ##[dotted]gold
state Foo2 ##[bold]green {
state inner2 ##[dotted]yellow
}
inner1 -> inner2
out -> inner2
@enduml
|
[Réf. QA-1487]
#color;line:color;line.[bold|dashed|dotted];text:color
FIXME
🚩
text:color semble ne pas être pris en compte
FIXME
🎉 Copied!
| @startuml
@startuml
state FooGradient #red-green;line:00FFFF
state FooDashed #red|green;line.dashed;line:blue {
}
state FooDotted #line.dotted;line:blue {
}
state FooBold #line.bold {
}
state Foo1 #line.dotted;line:green {
state inner1 #line.dotted;line:yellow
}
state out #line.dotted;line:gold
state Foo2 #line.bold;line:green {
state inner2 #line.dotted;line:yellow
}
inner1 -> inner2
out -> inner2
@enduml
@enduml
|
🎉 Copied!
| @startuml
state s1 : s1 description
state s2 #pink;line:red;line.bold;text:red : s2 description
state s3 #palegreen;line:green;line.dashed;text:green : s3 description
state s4 #aliceblue;line:blue;line.dotted;text:blue : s4 description
@enduml
|
[Adapté de QA-3770]
With State you can use
alias, like:
🎉 Copied!
| @startuml
state alias1
state "alias2"
state "long name" as alias3
state alias4 as "long name"
alias1 : ""state alias1""
alias2 : ""state "alias2"""
alias3 : ""state "long name" as alias3""
alias4 : ""state alias4 as "long name"""
alias1 -> alias2
alias2 -> alias3
alias3 -> alias4
@enduml
|
or:
🎉 Copied!
| @startuml
state alias1 : ""state alias1""
state "alias2" : ""state "alias2"""
state "long name" as alias3 : ""state "long name" as alias3""
state alias4 as "long name" : ""state alias4 as "long name"""
alias1 -> alias2
alias2 -> alias3
alias3 -> alias4
@enduml
|
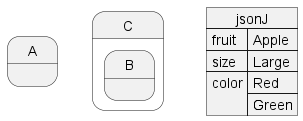
Simple example
🎉 Copied!
| @startuml
state "A" as stateA
state "C" as stateC {
state B
}
json jsonJ {
"fruit":"Apple",
"size":"Large",
"color": ["Red", "Green"]
}
@enduml
|
[Ref. QA-17275] For another example, see on
JSON page.