


New! Render PlantUML diagrams directly inside GitHub
with our official browser extension —
No server. No tokens. No tracking. Zero permissions but clipboard. —
Try it out and let us know what you think!
Sequenzdiagramm
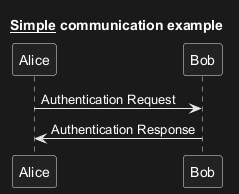
Sequenzdiagramme werden in PlantUML vollständig als Text definiert. Sie beschreiben die Teilnehmer und die Nachrichten, die sie austauschen. Layout, Abstände und Pfeile werden automatisch erzeugt.- Text rein, Diagramm raus. Der Quelltext ist die einzige Wahrheitsquelle: Was Sie lesen, wird genau so gerendert.
- Einfach zu bearbeiten. Eine Zeile Text anpassen statt Kästchen verschieben.
- Schnelle Iteration. Live-Vorschau-Tools rendern beim Tippen, sodass Fehler früh auffallen.
 Grundlagen
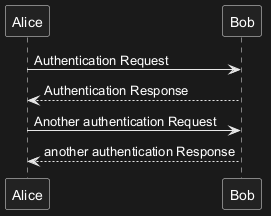
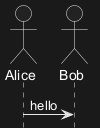
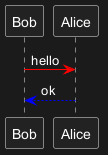
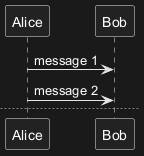
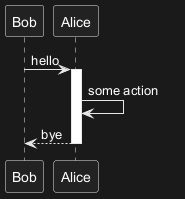
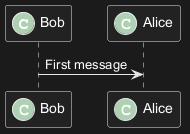
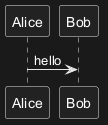
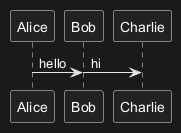
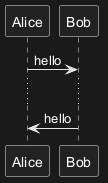
Die Zeichenfolge -> wird verwendet, um eine Nachricht zwischen zwei Teilnehmern zu zeichnen.
Teilnehmer müssen nicht explizit deklariert werden.
Um eine gepunktete Linie zu zeichnen, verwende -->.
Es ist auch möglich <- und <-- zu verwenden. Dieses
ändert nicht die Zeichnung, kann aber die Lesbarkeit erhöhen.
Beachte: Das gilt nur für Sequenzdiagramme. In anderen Diagrammen können andere Regeln gelten.
WARNING
This translation need to be updated. WARNING
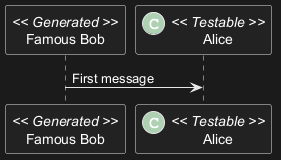
Deklaration eines Teilnehmers
Mit dem Schlüsselwort participant lässt sich die Reihenfolge von Teilnehmern ändern.
Sie können auch folgende andere Schlüsselwörter anstelle von participant verwenden:
actorboundarycontrolentitydatabasecollections

as umbenannt werden.
Die Hintergrundfarbe von Teilnehmern oder Akteuren kann mithilfe von HTML Farbcodes oder Farbbezeichnungen gesetzt werden.
order kann die Reihenfolge der Teilnehmer angepasst werden.
WARNING
This translation need to be updated. WARNING
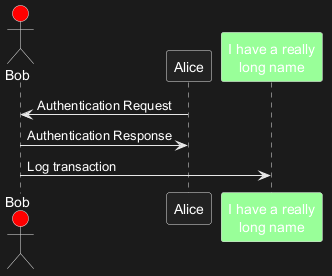
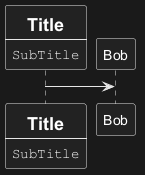
Deklaration eines Teilnehmers mit mehreren Zeilen
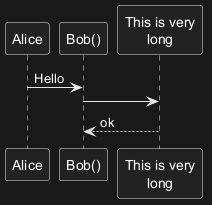
Der Bezeichner eines Teilnehmers kann mehrere Zeilen enthalten, zum Beispiel mit Titel und UnterTitel.
Verwendung von nicht-alphanumerischen Zeichen
Soll die Bezeichnung eines Teilnehmers nicht-alphanumerische Zeichen enthalten (z.B. Klammern oder Zeilenumbrüche), müssen Anführungszeichen bei der Definition verwendet werden. Das Schlüsselwort as kann verwendet werden, um einen Alias für einen Teilnehmer zu definieren.
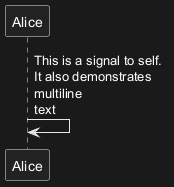
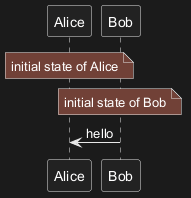
Nachrichten an sich selbst
Ein Teilnehmer kann auch eine Nachricht an sich selbst schicken.
Die Nachricht kann mehrere Zeilen umfassen. Mit \n können Zeilenumbrüche eingefügt werden.
WARNING
This translation need to be updated. WARNING
Text alignment
Text alignment on arrows can be set to left, right or center using skinparam sequenceMessageAlign.
You can also use direction or reverseDirection to align text depending on arrow direction. Further details and examples of this are available on the skinparam page.
Text of response message below the arrow
You can put the text of the response message below the arrow, with theskinparam responseMessageBelowArrow true command.
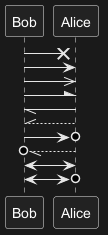
Change Actor style
You can change the actor style from stick man (by default) to:
- an awesome man with the
skinparam actorStyle awesomecommand; - a hollow man with the
skinparam actorStyle hollowcommand.
Stick man (by default)
Awesome man
Hollow man
Ändern der Pfeilart
Die Art eines Pfeils kann auf verschiedene Weise geändert werden:
- Für eine verloren gegangene Nachricht hängen Sie am Ende des Pfeils ein
xan. - Verwendung von
\oder/anstelle von<oder>, um nur den unteren oder oberen Teil des Pfeils zu zeichnen. - Verwendung von
>>oder//, um eine nicht ausgefüllte Pfeilspitze zu zeichnen. - Verwendung von
--anstelle von-, um eine gestrichelte Linie zu zeichnen. - Fügen Sie ein "o" am Ende des Pfeil an
- benutzen Sie zweiseitige Pfeile
<->
Ändern der Pfeil Farbe
Sie können die Farbe einzelner Pfeile mit folgender Notation ändern:
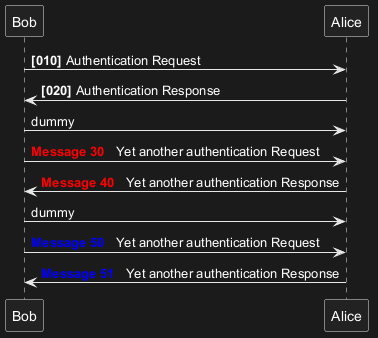
Nummerierung der Nachrichtenreihenfolge
Das Schlüsselwort autonumber kann verwendet werden, um Nachrichten automatisch zu nummerieren.

autonumber //start// festlegen und Sie können diese Nummer mit autonumber //start// //increment// um increment hochzählen.
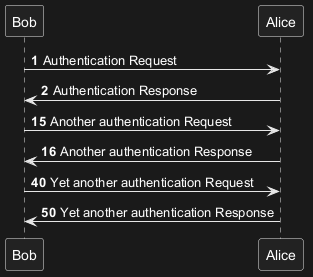
DecimalFormat verwendet (0 bedeutet Ziffer,
# bedeutet Ziffer und Null wenn die Ziffer fehlt.
Außerdem können HTML Tags für die Formatierung verwendet werden.

autonumber stop bzw.
autonumber resume //increment// //format// wird die Aufzählung pausiert bzw. wieder fortgesetzt.
WARNING
This translation need to be updated. WARNING
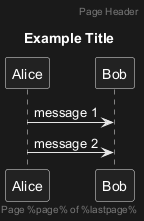
Seiten Titel, Kopf und Fuß
Mit dem Schlüsselwort title fügt man einen Titel zur Seite hinzu.
Seiten können Kopf- und Fußzeilen mit header und footer mitgegeben werden.
Aufteilung von Diagrammen
Das newpage Schlüsselwort wird verwendet, um ein Diagramm in mehrere Bilder aufzuteilen.
Man kann den Titel der neuen Seite direkt hinter dem newpage Schlüsselwort angeben.
Das ist sehr praktisch, um große Diagramme auf mehreren Seiten auszudrucken.
WARNING
This translation need to be updated. WARNING
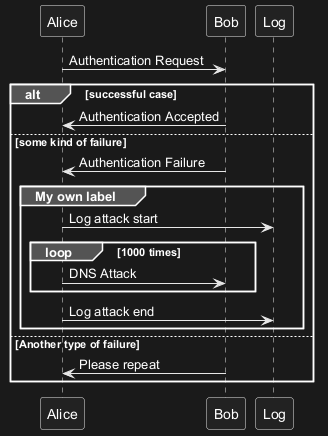
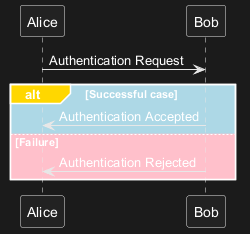
Gruppierung von Nachrichten
Nachrichten können mit den folgenden Schlüsselwörtern gruppiert werden:
alt/elseoptloopparbreakcriticalgroup, gefolgt von einem anzuzeigenden Text
end Schlüsselwort wird verwendet, um die Gruppe zu schließen.
Weiterhin ist es möglich, mehrere Gruppen ineinander zu schachteln.
WARNING
This translation need to be updated. WARNING
Zweites Label für group
Nach dem Schlüsselwort group kann man zwei Texte angeben. Der erste wird im Headerkästchen der Gruppe gezeigt, der zweite Text muss in eckige Klammern gestellt sein ([ und ]) und wird neben dem Headerkästchen angezeigt.

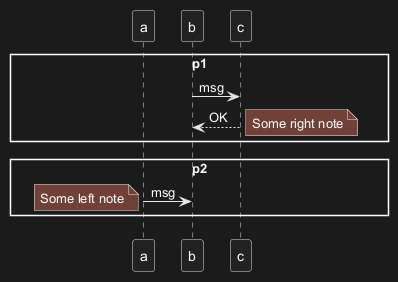
Partition across the entire width
You can use partition command to group messages horizontally across the entire width (full-width).
Messages are not grouped horizontally across the entire width (by default)
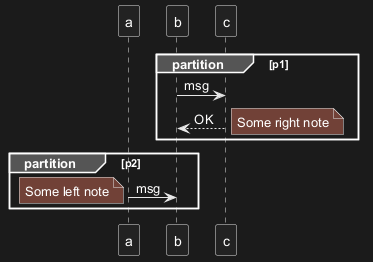
Grouping messages horizontally across the entire width (with teoz mode)
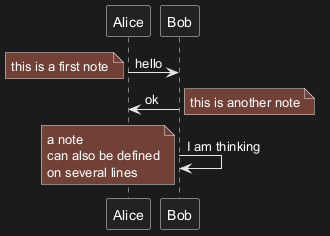
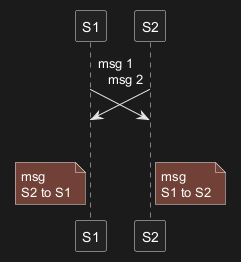
Notizen
Notizen zu einer Nachricht werden mit dem Schlüsselwort note left (links) oder note right (rechts) gleich nach der Nachricht eingeleitet.
Soll die Notiz mehrere Zeilen umfassen, muss das Schlüsselwort end note am Ende der Notiz verwendet werden..
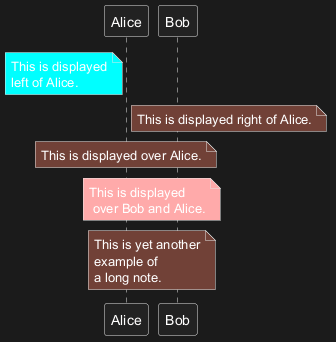
Weitere Möglichkeiten für Notizen
Weiterhin ist es Möglich, die Notizen rechts, links, oben oder unten an dem Teilnehmer zu platzieren:
Es ist möglich, die Notizen durch die Änderung der Hintergrundfarbe hervorzuheben.
Außerdem kann man durch die Verwendung des end note Schlüsselwortes mehrzeilige Notizen erzeugen.
WARNING
This translation need to be updated. WARNING
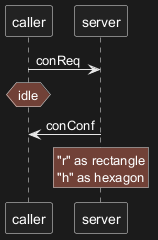
Ändern der Form von Notizen
Mit den Schlüsselwörtern hnote und rnote kann man die Form der Notiz ändern.
WARNING
This translation need to be updated. WARNING
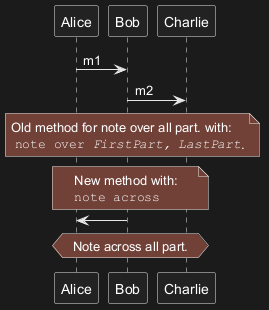
Note over all participants [across]
You can directly make a note over all participants, with the syntax:
note across: note_description
Several notes aligned at the same level [/]
You can make several notes aligned at the same level, with the syntax /:
- without
/(by default, the notes are not aligned)
- with
/(the notes are aligned)
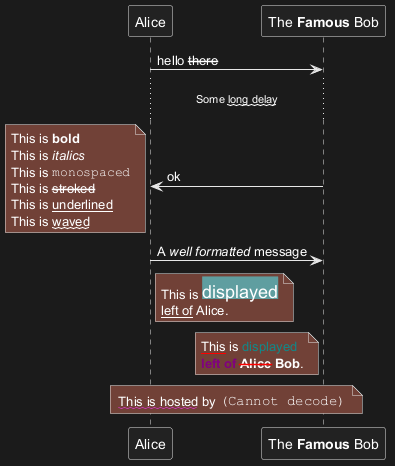
Creole und HTML
Es ist auch möglich, den Text mit Creole-Markup zu formatieren.
WARNING
This translation need to be updated. WARNING
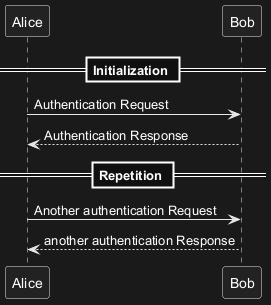
Diagramme aufteilen
Bei Bedarf kann ein Diagramm mit dem "==" Separator in logische Schritte unterteilt werden.
WARNING
This translation need to be updated. WARNING
Referenz
Die Referenz kann in einem Diagramm mit Hilfe des Schlüsselwortes ref over verwendet werden.
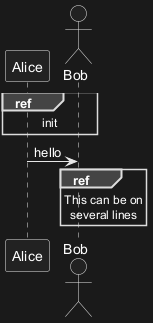
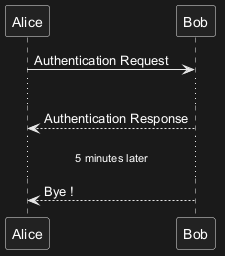
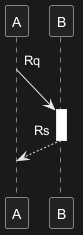
Verzögerungen
Mit ... kann man eine Verzögerung in dem Diagramm anzeigen. In dieser Verzögerung kann außerdem eine Nachricht angezeigt werden.
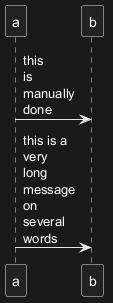
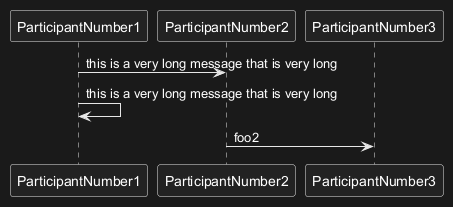
Text wrapping
To break long messages, you can manually add \n in your text.
Another option is to use maxMessageSize setting:
Message text spans beyond the involved participants
You can use sequenceMessageSpan command to allow message text to span beyond the involved participants.
Without sequenceMessageSpan (by default)
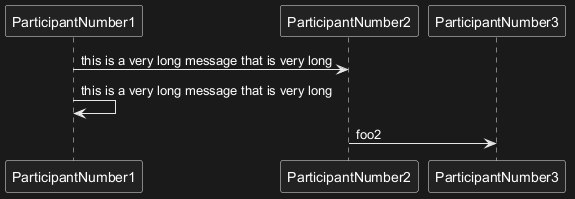
With sequenceMessageSpan (on teoz mode)
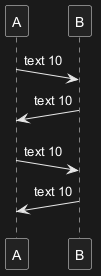
Abstände
Mit ||| kann ein Abstand zwischen zwei Nachrichten eingefügt werden.
Außerdem ist es möglich, die Größe des Abstandes in Pixeln festzulegen.
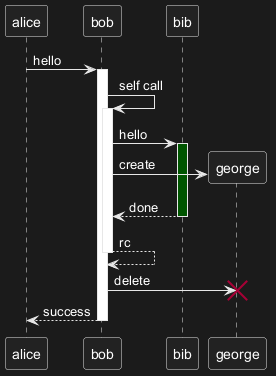
Aktivierung und Deaktivierung der Lebenslinie
Mit den Befehlen activate und deactivate können die Teilnehmer
aktiviert und deaktiviert werden.
Wenn ein Teilnehmer aktiviert wurde, dann erscheint seine Lebenlinie.
Die Befehle activate und deactivate wirken nach der vorhergehenden
Nachricht.
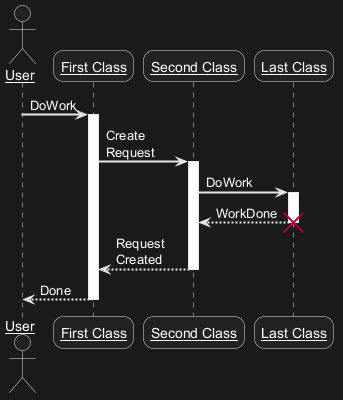
Der Befehl destroy beendet die Lebenslinie eines Teilnehmers.
WARNING
This translation need to be updated. WARNING
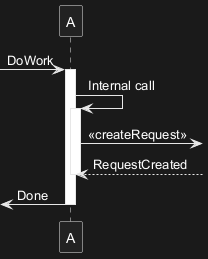
Return
A new command return for generating a return message with optional text label. The point returned to is the point that cause the most recently activated life-line. The syntax is simply return label where label, if provided, can be any string acceptable on conventional messages.
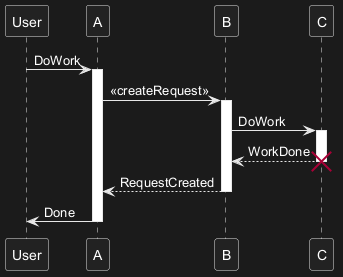
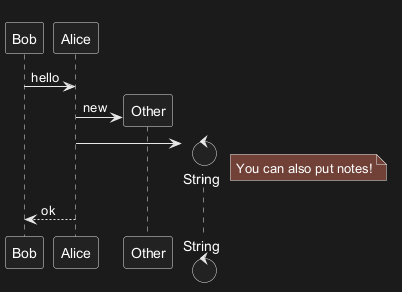
Erstellung von Teilnehmern
Das create Schlüsselwort kann kurz vor dem ersten Empfang
einer Nachricht verwendet werden, um anzuzeigen, das die Nachricht für die Erstellung
des neuen Objektes verantwortlich ist.
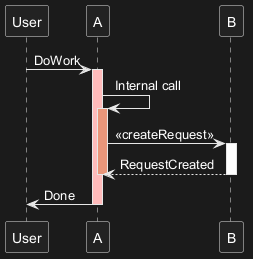
Shortcut syntax for activation, deactivation, creation
Immediately after specifying the target participant, the following syntax can be used:
++Activate the target (optionally a #color may follow this)--Deactivate the source**Create an instance of the target!!Destroy an instance of the target
WARNING
This translation need to be updated. WARNING
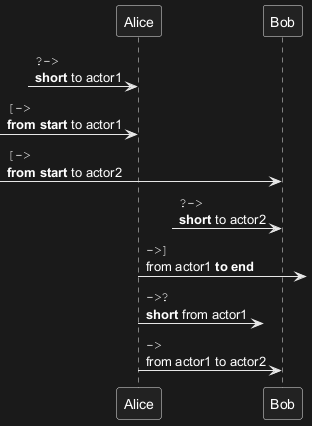
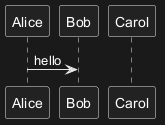
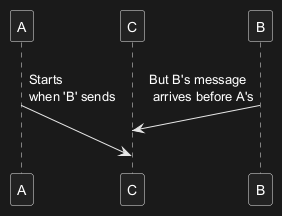
Eingehende und ausgehende Nachrichten
Um sich nur auf ein Teil des Diagramms zu konzentrieren, kann man eingehende und ausgehende Pfeile verwenden.
Mit eckigen Klammern kann man die linke "[" oder die
rechte "]" Seite des Pfeils festlegen.
WARNING
This translation need to be updated. WARNING
Kurze Pfeile für eingehende und ausgehende Nachrichten
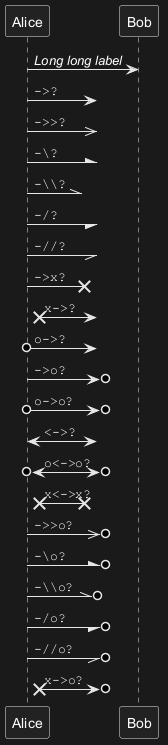
Es gibt kurze Pfeile indem man ? verwendet.
Anchors and Duration
With teoz usage it is possible to add anchors to the diagram and use the anchors to specify duration time.
WARNING
This translation need to be updated. WARNING
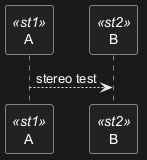
Stereotypen
Man kann den Objekten Stereotypen zuweisen, indem man den Stereotyp mit zwei spitzen öffnenden "<<" und
schließenden Klammern ">>" umschließt.
Innerhalb des Stereotypen ist es möglich einen hervorgehobenen Buchstaben hinzuzufügen, der in einem farbigen Kreis dargestellt wird.
Dazu verwendet man die folgende Syntax: "(X,color)".
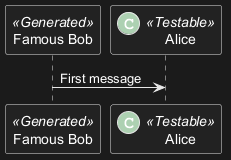
skinparam guillemet Befehl beeinflusst werden.
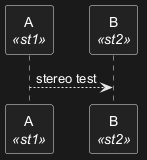
Position of the stereotypes
It is possible to define stereotypes position (top or bottom) with the command skinparam stereotypePosition.
Top postion (by default)
Bottom postion
Mehr Information zu Überschriften
Mit Creole-Markup ist es möglich, die Überschrift des Diagramms zu formatieren.
\n in die Überschrift der Bezeichnung eingetragen werden.
title und
end title Schlüsselwörtern erstellt werden.

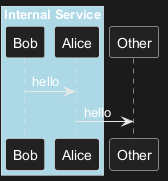
Anpassungen bei den Teilnehmern
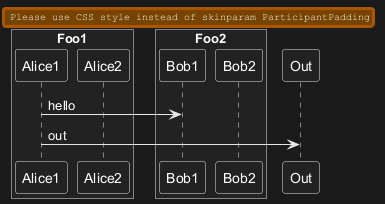
Es ist möglich Boxen um Teilnehmer zu zeichnen, indem man die Befehle box und
end box benutzt.
Man kann optional noch einen Titel oder eine Hintergrundfarbe
nach dem box Schlüsselwort hinzufügen.
WARNING
This translation need to be updated. WARNING
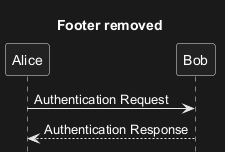
Fußzeile entfernen
Die Fußzeile eines Diagramms kann mit dem hide footbox Schlüsselwort entfernt werden.
Der Skinparam Befehl
Mit dem skinparam Befehl kann die Farbe und die Schriftart der Zeichnung verändert werden.
Sie können den Befehl auf die folgenden Arten verwenden:
- Wie alle ander Befehle In einer Diagrammdefinition,
- in einer Include-Datei,
- In einer Konfigurationsdatei, die durch die Kommandozeile oder den ANT-Task übergeben wird.
WARNING
This translation need to be updated. WARNING
Anpassung von Abstandswerten
Einige Werte, die den Abstand zwischen Elementen definieren, können angepasst werden.
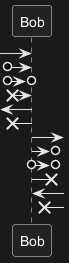
Appendix: Examples of all arrow type
Normal arrow

Itself arrow

Incoming and outgoing messages (with '[', ']')
Incoming messages (with '[')

Outgoing messages (with ']')

Short incoming and outgoing messages (with '?')
Short incoming (with '?')
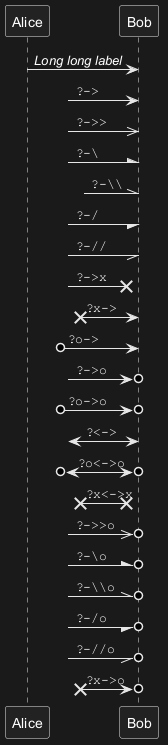
Short outgoing (with '?')
Specific SkinParameter
By default
Style strictuml
To be conform to strict UML (for arrow style: emits triangle rather than sharp arrowheads), you can use:skinparam style strictuml
LifelineStrategy
nosolid/solid
skinparam lifelineStrategy solid no longer works.
[Ref. QA-9016, QA-2794]
In order to have solid life line in sequence diagrams, you must now use style:

Hide unlinked participant
By default, all participants are displayed.
hide unlinked participant.
Color a group message
It is possible to color a group messages:
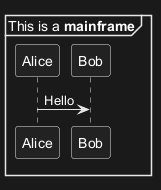
Mainframe
Slanted or odd arrows
You can use the (nn) option (before or after arrow) to make the arrows slanted, where nn is the number of shift pixels.
[Available only after v1.2022.6beta+]
Parallel messages (with teoz)
You can use the & teoz command to display parallel messages:
Style for Solid Lifeline
By default
Solid Lifeline using style
