New! Render PlantUML diagrams directly inside GitHub
with our official browser extension —
No server. No tokens. No tracking. Zero permissions but clipboard. —
Try it out and let us know what you think!
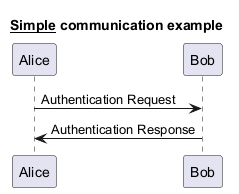
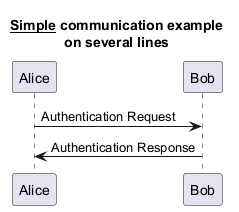
시퀀스 다이어그램
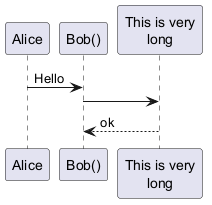
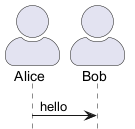
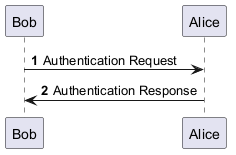
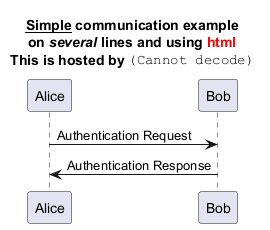
PlantUML의 시퀀스 다이어그램은 전부 텍스트로 정의됩니다. 참가자와 그들이 주고받는 메시지를 작성하기만 하면, 레이아웃, 간격, 화살표는 자동으로 생성됩니다.- 텍스트 입력, 다이어그램 출력. 소스가 유일한 진실 공급원이며, 작성한 그대로 렌더링됩니다.
- 편집이 간편합니다. 도형을 드래그하는 대신 텍스트 한 줄만 수정하면 됩니다.
- 빠른 반복. 라이브 프리뷰 도구가 입력하는 동안 실시간으로 렌더링하므로, 오류를 일찍 발견할 수 있습니다.
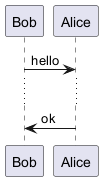
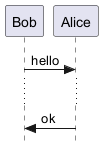
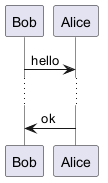
 기본 예제
기본 예제
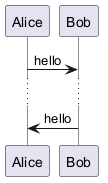
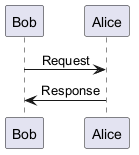
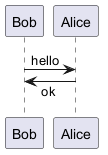
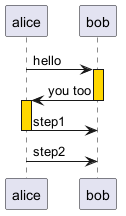
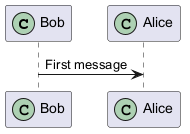
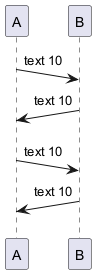
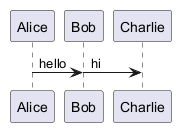
시퀀스 ->는 두 참여자들 사이의 메시지를 그리기 위해 사용된다.
참여자들은 명시적으로 선언하지 않아도 된다.
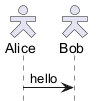
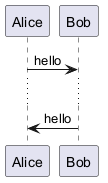
점선 화살표를 만들기 위해서는 -->를 사용한다.
또한 <-과 <--를 사용할 수 있다.
출력되는 그림은 변경되지 않지만, 가독성을 향상시키는데 사용할 수 있다.
이는 시퀀스 다이어그램에만 적용되며, 다른 다이어그램에는 다른 규칙이 적용된다.
WARNING
This translation need to be updated. WARNING
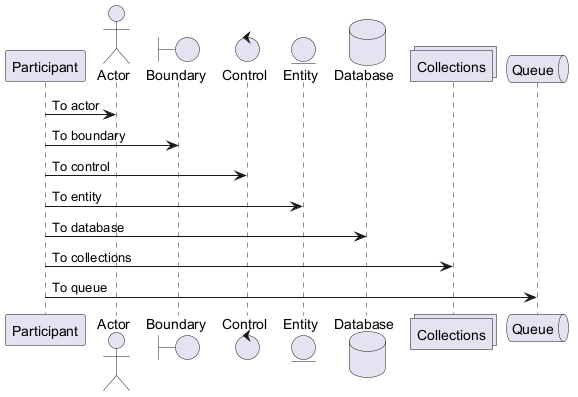
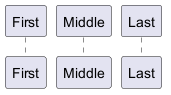
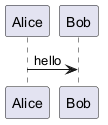
참여자(participant) 선언
참여자를 선언하기 위해 participant 키워드를 사용하면, 해당 참여자에 더 많은 제어를 할 수 있습니다.
선언의 순서는 (기본으로) 표시되는 순서가됩니다.
또한, 참여자 선언에 다음과 같은 키워드를 사용하면, 참여자를 나타내는 모양을 바꿀 수 있습니다.
actorboundarycontrolentitydatabasecollectionsqueue
as 키워드를 이용하여 참여자의 이름을 변경 할 수 있다.
또한, 참여자(actor, participant)의 배경 색을 변경 할 수도 있다.
order 키워드를 이용하여, 참여자의 출력 순서를 지정할 수 있다.
WARNING
This translation need to be updated. WARNING
여러줄에서 참여자 선언하기
참여자를 여러줄에서 선언할 수 있습니다.
참여자에서 특수문자 사용하기
따옴표를 사용하여 참여자를 정의할 수 있다.
그리고 "as" 키워드를 사용하여 참여자를 별칭으로 사용 할 수도 있다.
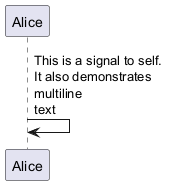
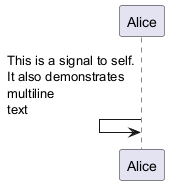
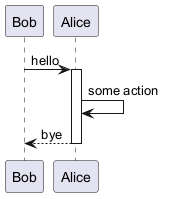
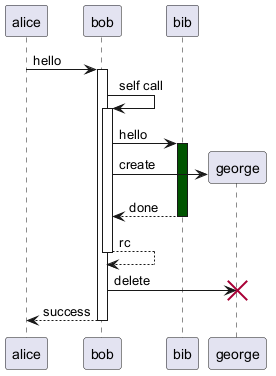
자신에게 메시지 보내기
참여자는 자기 자신에게 메시지를 보낼 수 있다.
\n 을 이용해서 여러 줄로 쓰는 것도 가능하다
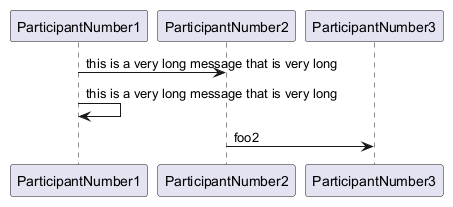
텍스트 정렬
화살표의 텍스트 정렬은 skinparam sequenceMessageAlign을 사용하여 left, right, center를 설정할 수 있습니다.
direction 또는 reverseDirection을 사용하여 화살표 방향에 따라 텍스트 정렬을 할 수 있습니다. skinparam 페이지에서 상세한 예제를 볼 수 있습니다.
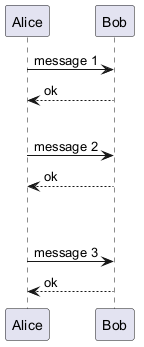
응답 메세지 텍스트를 화살표 아래에 배치하기
skinparam responseMessageBelowArrow true 명령을 이용하여 응답 메세지 텍스트를 화살표 하단에 배치할 수 있습니다.
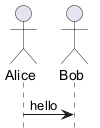
Change Actor style
You can change the actor style from stick man (by default) to:
- an awesome man with the
skinparam actorStyle awesomecommand; - a hollow man with the
skinparam actorStyle hollowcommand.
Stick man (by default)
Awesome man
Hollow man
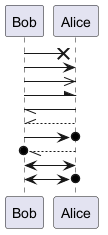
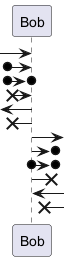
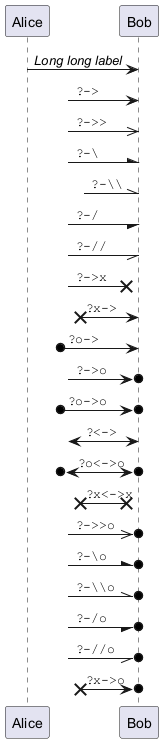
화살표 스타일 변경
다음 방법으로 화살표 스타일을 바꿀 수 있다 :
- 끝 부분에
x를 추가하여 메시지가 전달되지 않았음을 표시 할 수 있다. <나>대신에\나/를 사용해서- 아래쪽이나 위쪽 화살표만 표시한다.
- {$>$}를 두번 사용하여 화살표 모양을 얇게 표시 할 수 있다. (예.
>>) -대신--를 사용해서 점선 화살표를 표시한다.- 화살표 다음에 "o" 추가도 가능하다.
- 양쪽 끝에 화살표 추가도 가능하다.
화살표 색상 변경
다음의 표기법을 이용해서 각각 화살표의 색상을 바꿀 수 있다.
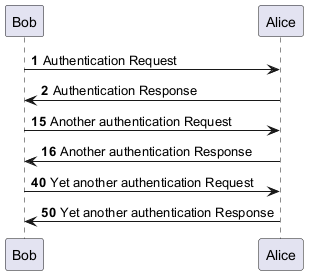
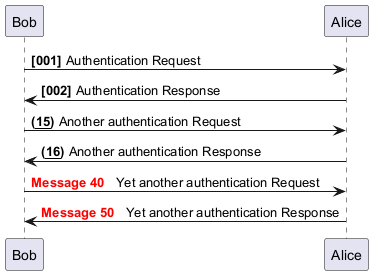
메시지 순서에 번호 매기기
autonumber 키워드는 메시지에 자동으로 증가하는 번호를 매길 때에 사용합니다.
autonumber <시작번호> 의 형태로 표시하면 특정 번호로 시작 할 수 있으며,
autonumber <시작번호> <증가값> 으로 표시 할 경우 증가 값을 조정하는 것도 가능하다.
DecimalFormat 을 사용한다.
(0 은 숫자를 의미하며, # 은 숫자로 표시하되, 빈 자리이면 0 으로 채우라는 뜻이다).
몇 가지 html 태그를 사용 할 수 있다.
autonumber stop 키워드를 이용하여 번호 매김을 일시 정지할 수 있으며,
autonumber resume <증가값> <표시형식> 키워드를 이용하여 계속해서 번호를 매길 수 있다.
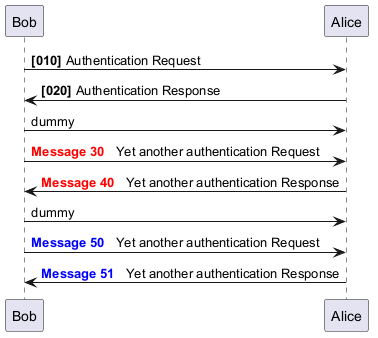
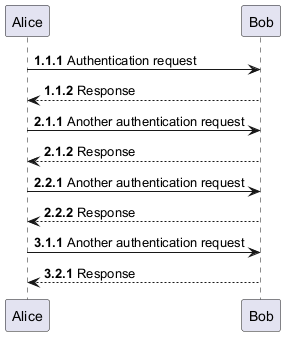
., ;, ,, : 같은 필드 구분자 또는 필드 구분자의 조합으로 2자리 또는 3자리의 번호의 시작 번호를 사용할 수 있습니다. 예제: 1.1.1 또는 1.1:1.
자동으로 마지막 자릿수가 증가합니다.
첫째자리를 증가하려면, autonumber inc A를 사용하십시오. 둘째자리를 증가하려면, autonumber inc B를 사용하십시오.
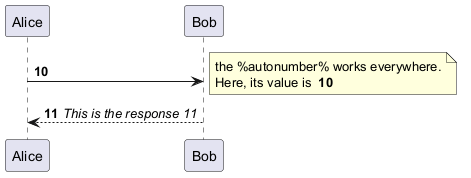
%autonumber% 변수를 사용하여 autonumber를 사용할 수 있습니다.:
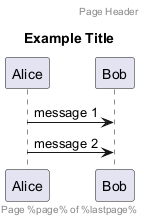
페이지 제목, 머리말과 꼬리말
title 키워드를 이용하여 페이지에 제목을 추가할 수 있다.
또한, header 와 footer 를 이용하여, 각각 머리말과 꼬리말을 표시할 수도 있다.
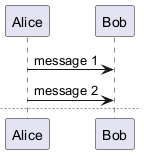
다이어그램 분리
newpage 키워드를 이용하여, 다이어그램을 여러 개의 이미지로 분리 할 수 있다.
newpage 키워드 뒤에 바로 새로 생성되는 페이지의 제목을 넣을 수 있다.
여러 페이지에 걸쳐 있는 긴 다이어그램을 출력할 때 유용하다.
(주: 예제에서 첫 번째 페이지만 표시되었지만, 실제로 잘 동작하는 기능이다.)
WARNING
This translation need to be updated. WARNING
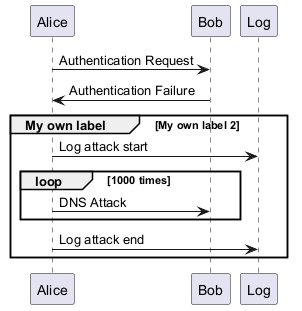
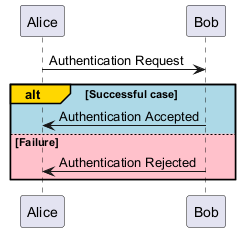
메세지 그룹화
다음과 같은 키워드들을 사용하여 메세지를 그룹화 할 수 있다:
alt/elseoptloopparbreakcriticalgroup, 화면에 보여질 텍스트
group에 대해서는, 다음 '보조 그룹 레이블'을 참조하십시오.).
end 키워드는 그룹을 닫는데 사용한다.
또한, 그룹을 중첩해서 만들 수도 있다.
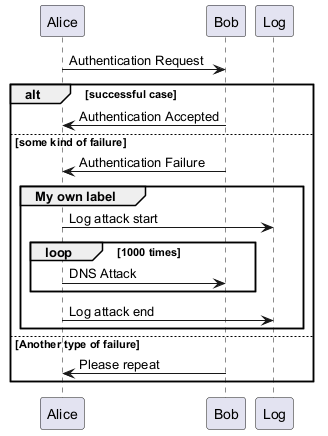
보조 그룹 레이블
group을 위해, [ 하고 ] 사이에, 머릿글에 표시되도록 보조 문자열이나 레이블을 추가할 수 있습니다.
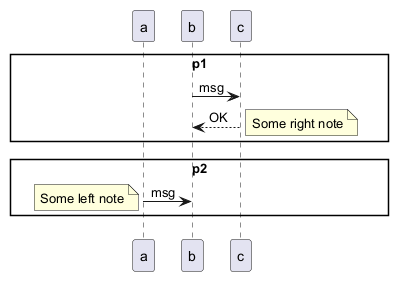
Partition across the entire width
You can use partition command to group messages horizontally across the entire width (full-width).
Messages are not grouped horizontally across the entire width (by default)
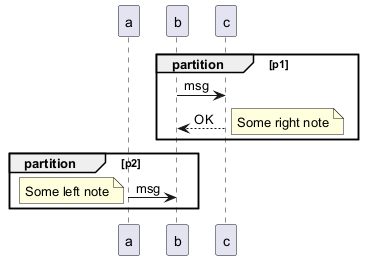
Grouping messages horizontally across the entire width (with teoz mode)
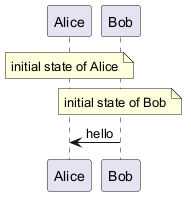
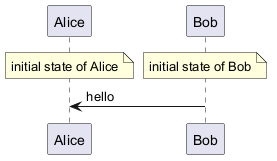
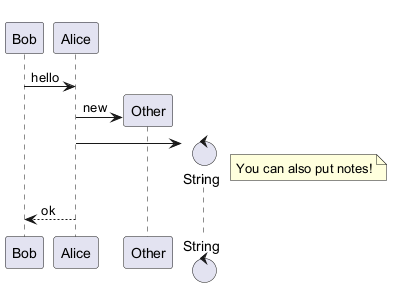
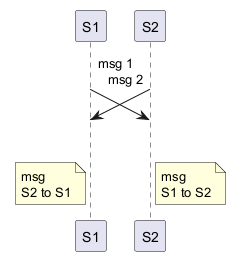
메시지에 노트 추가하기
메시지 다음에 note left 나 note right 키워드를 이용하여, 메시지에 노트를 추가할 수 있다.
또한, 한 번에 여러 줄의 노트를 추가하는 경우에는 end note 를 이용하여, 노트의 끝을 표시해 주어야 한다.
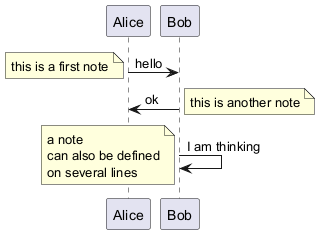
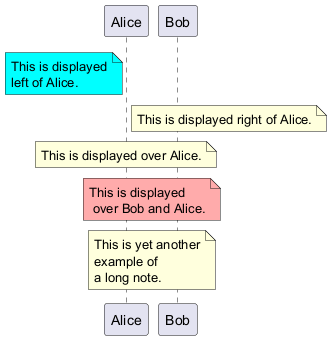
다른 형태의 노트들
note left of , note right of, note over 키워드를 이용하여 참여자의 상대적인 위치에 노트를 추가할 수도 있다.
노트의 배경 색을 변경함으로써, 노트를 강조하는 것도 가능하다.
한 번에 여러 줄의 노트를 추가하는 경우에는, end note 를 이용하여 노트의 끝을 표시해 주어야 한다.
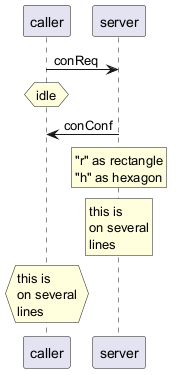
노트 모양 바꾸기
hnote 와 rnote 키워드를 이용하여, 노트의 모양을 바꿀 수 있습니다:
hnote는 육각형 노트;rnote는 사각형 노트.
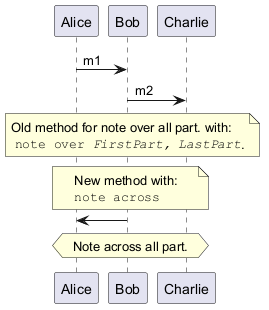
Note over all participants [across]
다음의 문법을 이용해서 모든 참여자에 걸치도록 노트를 작성할 수 있다:
note across: note_description
Several notes aligned at the same level [/]
/ 을 사용하여 여러 개의 note를 같은 레벨로 정렬하여 작성할 수 있다 :
- without
/(by default, the notes are not aligned)
- with
/(the notes are aligned)
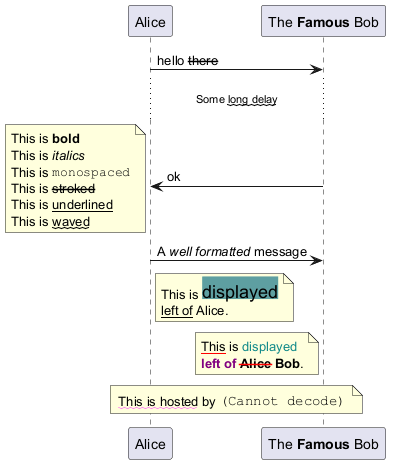
Creole 과 HTML
creole 문법을 사용할 수도 있다:
WARNING
This translation need to be updated. WARNING
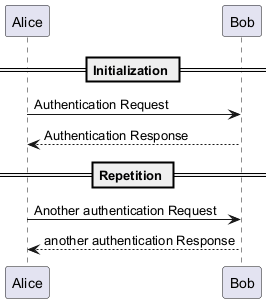
구분자 또는 분리자
== 구분자를 이용하여, 다이어그램을 논리적인 단계로 구분하여 나눌 수 있다.
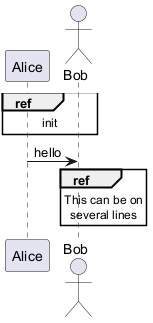
참조
ref over 키워드를 이용하여, 다이어그램에 참조를 표시할 수 있다.
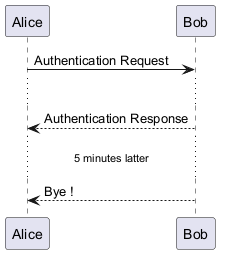
지연
... 을 이용하여, 다이어그램에 지연 상태를 나타낼 수 있으며, 그 위에 메시지를 추가할 수도 있다.
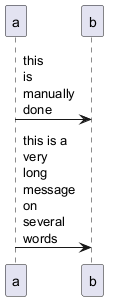
문장 줄 바꿈
긴 메시지를 줄 바꿈하려면, 문장 안에 \n을 추가한다.
다른 방법은 maxMessageSize 설정을 사용한다:
Message text spans beyond the involved participants
You can use sequenceMessageSpan command to allow message text to span beyond the involved participants.
Without sequenceMessageSpan (by default)
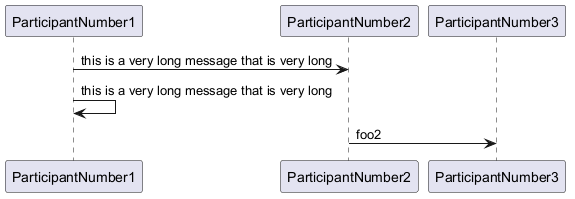
With sequenceMessageSpan (on teoz mode)
공백
||| 을 이용하여 다이어그램에 공백을 나타낼 수 있으며, 공백에 얼마만큼의 픽셀을 사용할 것인지 숫자로 명시할 수도 있다.
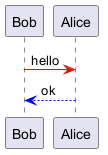
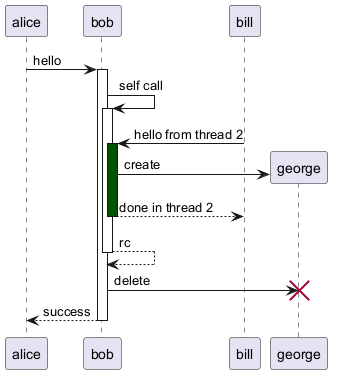
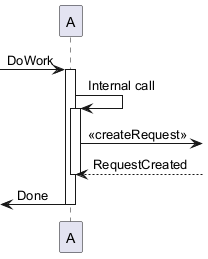
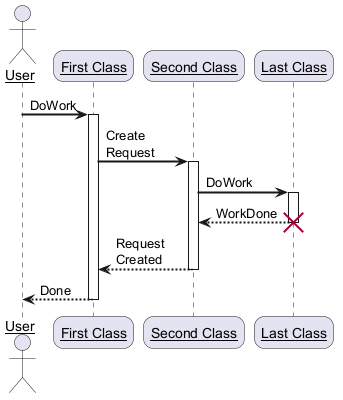
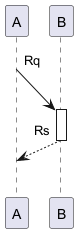
생명선 활성화 및 비활성화
activate 와 deactivate 는 참여자의 활성화 여부를 표현하는데 사용한다.
참여자가 활성화되면, 참여자의 생명선이 나타난다.
activate 와 deactivate 는 바로 이전의 메시지에 적용된다.
destroy 는 참여자의 생명선이 끝났음을 표현한다.
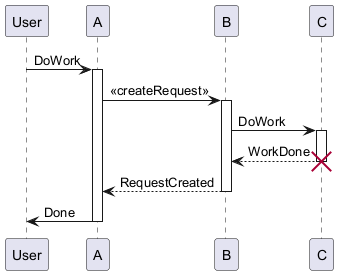
return 키워드를 사용하여 자동활성화도 가능합니다.
리턴
return 명령은 추가 텍스트 레이블과 함께 리턴 메시지를 생성합니다.
리턴되는 지점은 가장 최근에 생명선을 활성화 시킨 지점의 출발점이 된다.
문법은 간단히 return label 이며, label은 기존의 메시지와 마찬가지로 임의의 문자열을 쓸 수 있다.
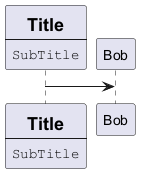
참여자 생성
해당 메시지가 실제로 새 객체를 생성한다는 걸 강조하기 위해, 참여자가 첫 번째 메시지를 수신하기 전에 create 키워드를 사용할 수 있다.
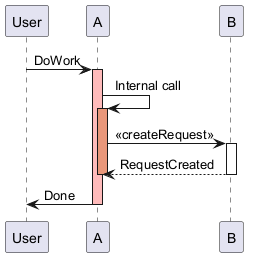
활성화, 비활성화, 생성을 위한 단축키
참여대상을 지정한 직후 다음 문법을 사용할 수 있습니다:
++대상 활성화 (추가로 색을 따를 수 있습니다.)--원본 비활성화**대상 인스턴스 생성!!대상 인스턴스 파괴

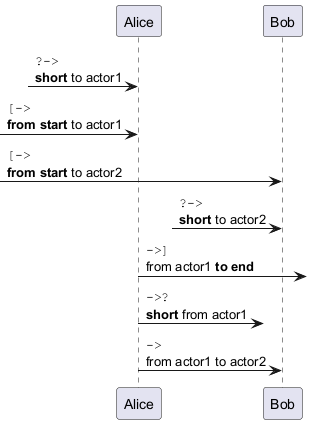
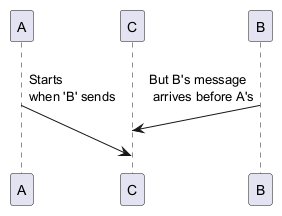
Incoming and outgoing messages
You can use incoming or outgoing arrows if you want to focus on a part
of the diagram.
Use square brackets to denote the left "[" or the
right "]" side of the diagram.
WARNING
This translation need to be updated. WARNING
Short arrows for incoming and outgoing messages
You can have short arrows with using ?.
Anchors and Duration
With teoz it is possible to add anchors to the diagram and use the anchors to specify duration time.
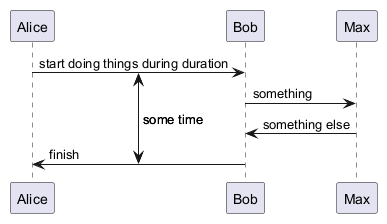
-P command-line option to specify the pragma:
java -jar plantuml.jar -Pteoz=true
[Ref. issue-582]
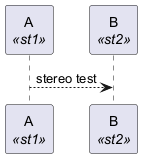
Stereotypes and Spots
It is possible to add stereotypes to participants using <<
and >>.
In the stereotype, you can add a spotted character
in a colored circle using the syntax (X,color).
guillemet:
Position of the stereotypes
It is possible to define stereotypes position (top or bottom) with the command skinparam stereotypePosition.
Top postion (by default)
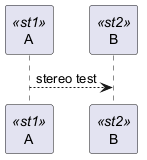
Bottom postion
More information on titles
You can use creole formatting in the title.
\n in the title description.
title
and end title keywords.
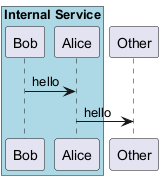
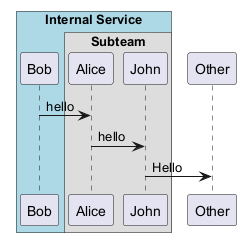
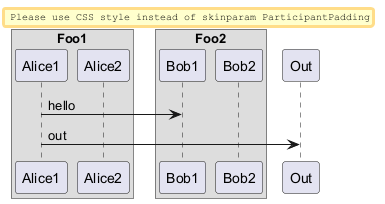
Participants encompass
It is possible to draw a box around some participants, using box
and end box commands.
You can add an optional title or a
optional background color, after the box keyword.
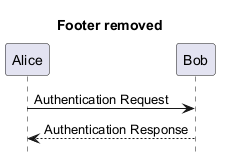
Removing Footer
You can use the hide footbox keywords to remove the footer
of the diagram.
Skinparam
You can use the skinparam
command to change colors and fonts for the drawing.
You can use this command:
- In the diagram definition, like any other commands,
- In an included file,
- In a configuration file, provided in the command line or the ANT task.
WARNING
This translation need to be updated. WARNING
Changing padding
It is possible to tune some padding settings.
Appendix: Examples of all arrow type
Normal arrow

Itself arrow

Incoming and outgoing messages (with '[', ']')
Incoming messages (with '[')

Outgoing messages (with ']')

Short incoming and outgoing messages (with '?')
Short incoming (with '?')
Short outgoing (with '?')

Specific SkinParameter
By default
Style strictuml
To be conform to strict UML (for arrow style: emits triangle rather than sharp arrowheads), you can use:skinparam style strictuml
LifelineStrategy
nosolid/solid
skinparam lifelineStrategy solid no longer works.
[Ref. QA-9016, QA-2794]
In order to have solid life line in sequence diagrams, you must now use style:
Hide unlinked participant
By default, all participants are displayed.

hide unlinked participant.
Color a group message
It is possible to color a group messages:
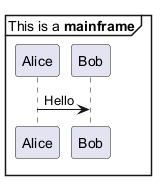
Mainframe
Slanted or odd arrows
You can use the (nn) option (before or after arrow) to make the arrows slanted, where nn is the number of shift pixels.
[Available only after v1.2022.6beta+]
Parallel messages (with teoz)
You can use the & teoz command to display parallel messages:
Style for Solid Lifeline
By default
Solid Lifeline using style