


New! Render PlantUML diagrams directly inside GitHub
with our official browser extension —
No server. No tokens. No tracking. Zero permissions but clipboard. —
Try it out and let us know what you think!
クラス図
クラス図は、システムの静的構造を表現します。クラス、それらの属性とメソッド、およびクラス間の関係を記述するもので、コードの構成と設計を文書化するために最も広く使われている UML 図です。 PlantUML では、構文がプログラミング言語に似ているため、属性、メソッド、可視性の記号がそのまま自然に書けます。関係を表す矢印はシーケンス図と同じスタイルを採用しています。- テキストを入力、図を出力。 クラス、フィールド、関係を数行で宣言できます。
- コードのように読める。
+、-、#で可視性、:で型、()でメソッドを表します。 - 自由に注釈を追加。 ノート、色、ステレオタイプをテキスト内でそのまま記述できます。
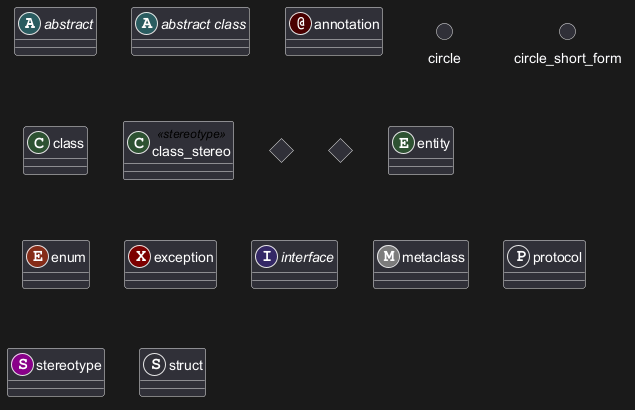
 宣言する要素
protocol,struct の場合 :GH-1028、exception の場合 :QA-16258] を参照。
[Ref. for protocol and struct: GH-1028, for exception: QA-16258, for record and dataclass: GH-2232]
[Ref. for protocol and struct: GH-1028; for exception: GH-1056, QA-16258; for metaclass and stereotype: GH-1159, QA-16784; for record and dataclass: GH-2232]
WARNING
This translation need to be updated. WARNING
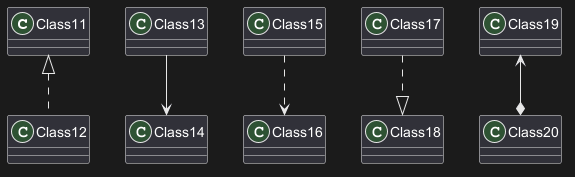
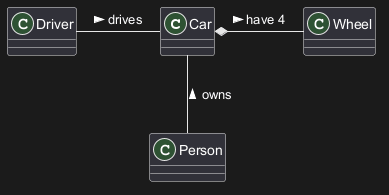
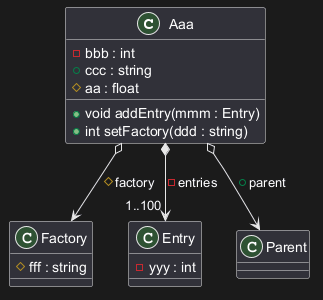
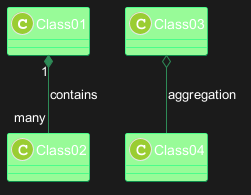
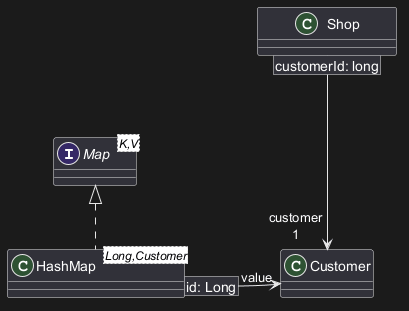
クラス間の関係
クラス間の関係は次の記号を使用して定義されています :
| タイプ | 記号 | 目的 |
| 拡張 |
<|--
|
階層内のクラスの特殊化 |
| 実装 |
<|..
|
クラスによるインターフェースの実現 |
| 構成 |
*--
|
全体なくして部分は存在しない |
| 集約 |
o--
|
部分は全体から独立して存在できる |
| 依存性 |
-->
|
オブジェクトが別のオブジェクトを使用する |
| 従属性 |
..>
|
より弱い形の依存関係 |
-- を .. に置き換えると点線にできます。
これらのルールを知ることで、以下の図面を描くことができます:

WARNING
This translation need to be updated. WARNING
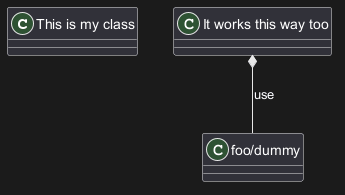
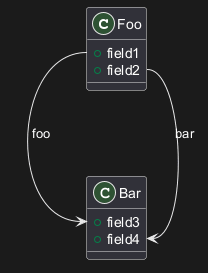
リレーションにラベルを付ける
リレーションにラベルを付けることができます。: 、
の後にラベルのテキストを記述します。
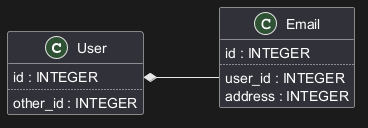
カーディナリティについては、リレーションの各辺
にダブルクォート"" を使用することができます。
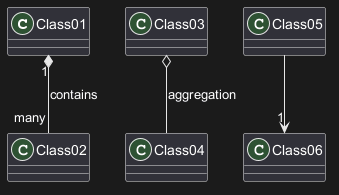
< または を使って、ラベルの最初か最後に、どのオブジェクトがもう一方のオブジェクトに作用するかを示す、一方のオブジェクトを指す矢印を追加することができます。>
要素名と関係のラベルでの非文字の使用
クラス(または列挙型など)の表示に文字以外を使用したい場合は、次のいずれかの方法ですることができます:
- クラス定義でキーワード
asを使用して別名を付ける - クラス名の前後に引用符
""を入れる
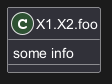
$で始まる名前
名前が$で始まる場合、後で要素を非表示にしたり削除したりできません。なぜならhideとremoveのコマンドは$で始まる文字列をコンポーネントの名前ではなくタグ($tag)として扱うからです。そのような要素を削除するには、別名を付けるかタグを付ける必要があります。

$で始まる名前は有効ですが、そのような要素に別名を付けるには、クォーテーション""で囲む必要があることにも注意してください。
メソッドの追加
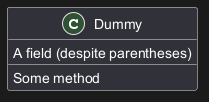
:に続けてフィールド名やメソッド名を記述すると、フィールドやメソッドを宣言できます。
システムは括弧をチェックしてメソッドとフィールドのどちらなのかを選択します。

{} を使って、フィールドやメソッドをくくることもできます。
構文はタイプや名前の順番について非常に柔軟であることに注意してください。
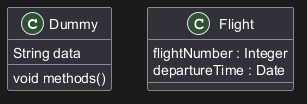
{field} や {method} 修飾子を用いれば、構文によりフィールドやメソッドだと通常は解釈されるものを強制的に変更することができます。
可視性の定義
メソッドやフィールドを定義するときに対応する項目の可視性を定義する記号を使用することができます。
| 文字 | フィールドのアイコン | メソッドのアイコン | 可視性 |
-
|

|

|
private
|
#
|

|

|
protected
|
~
|

|

|
package private
|
+
|

|

|
public
|
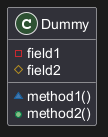
skinparam classAttributeIconSize 0 を使用してこの機能を切ることができます。
WARNING
This translation need to be updated. WARNING
Visibility on compositions and aggregations
Abstract と Static
静的または抽象的なメソッドまたはフィールドは {static} または {abstract} 修飾子を使用することで定義することができます。
これらの修飾子は行の始めまたは終りに使用することができます。
{static} の代わりに {classifier} もまた使用できます。
高等なクラス本体
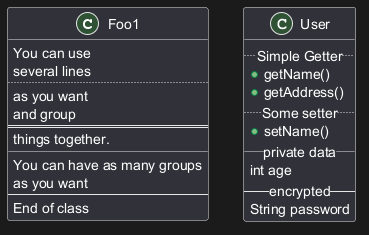
デフォルトでは,メソッドやフィールドは PlantUML によって自動再編成されます。メソッドやフィールドに独自の順序付けを定義するためのセパレータを使用できます。以下のセパレータが使用できます: -- .. == __
セパレータ内でタイトルを使用することもできます:
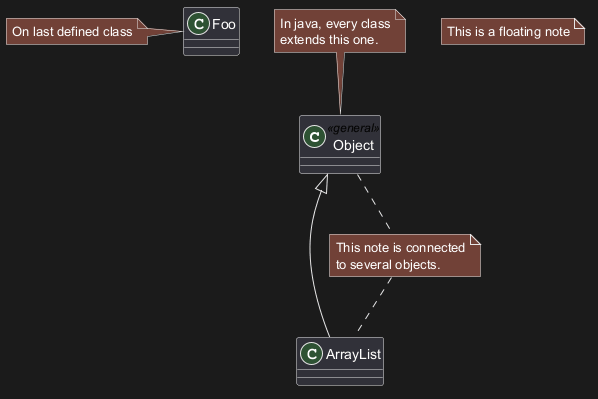
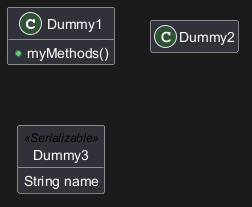
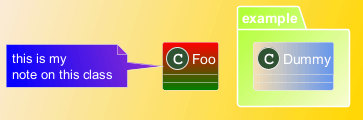
注釈とステレオタイプ
ステレオタイプは、キーワード class に << と >> で定義されます。
注釈の定義には、キーワード note left of, <code>note
right of</code>, note top of, note bottom of も使用できます。
クラス定義の最後には note left, note right,
note top, note bottom も使用できます。
注釈は、キーワード note とで単独に定義することができ、記号 .. を使用して他のオブジェクトとリンクすることもできます。
WARNING
This translation need to be updated. WARNING
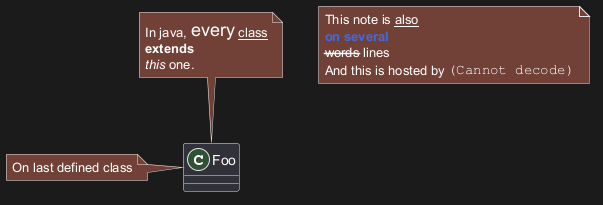
注釈の詳細
次のようないくつかの HTML タグを使用することも可能です(Creole表現を参照):
<b><u><i><s>,<del>,<strike><font color="#AAAAAA">or<font color="colorName"><color:#AAAAAA>or<color:colorName><size:nn>to change font size<img src="file">or<img:file>: the file must be accessible by the filesystem
note left, note right,
note top, note bottom も使用できます。
WARNING
This translation need to be updated. WARNING
フィールド(フィールド、属性、メンバー)またはメソッドへの注釈
フィールド(フィールド、属性、メンバー)またはメソッドに注釈を追加することができます。
⚠ 制限事項
top、bottomを指定することはできません(leftとrightのみ実装されています)- 名前空間の区切り文字列(namespaceSeparator)を
::に設定した場合、この機能は使えません。
フィールドまたはメンバーへの注釈
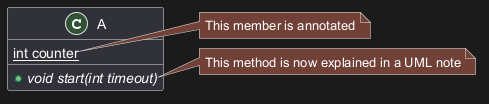
同名のメソッドへの注釈

WARNING
This translation need to be updated. WARNING
リンクへの注釈
リンク定義の直後に note on link を使用して、リンクに注釈を加えることが可能です。
もし注釈の相対位置を変えたい場合には、ラベル note left on link, note right on link, note top on link, note bottom on link も使用できます。

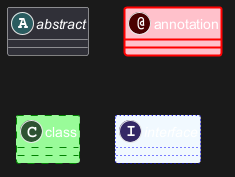
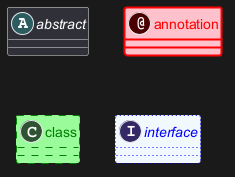
抽象クラスとインタフェース
抽象クラスは、キーワード abstract または abstract class を使用して宣言できます。
そのクラスは イタリック体 で印字されます。
キーワード interface, annotation と enum も使用できます。
属性、メソッド等の非表示
コマンド hide/show を使用して、クラスの表示をパラメータ化できます。
基本のコマンドは hide empty members です。このコマンドは属性やメソッドが空の場合に非表示にします。
empty members の代わりに使用することができます:
empty fieldsまたはempty attributesは空のフィールドに、empty methodsは空のメソッドに、fieldsまたはattributesは、それらが記述されていても非表示になります、methodsはメソッドが記述されていても非表示になります、membersはフィールドとメソッドが記述されていても非表示になります、circleはクラス名の前の丸で囲んだ文字に、stereotypeはステレオタイプに。
hide または show のすぐ後ろに提供することもできます:
classは全てのクラスに、interfaceは全てのインタフェースに、enumは全ての列挙型に、<<foo1>>は foo1 でステレオタイプ化されたクラスに、- 既存のクラス名。
show/hide をルールや例外の定義にそれぞれ使用することができます。
WARNING
This translation need to be updated. WARNING
非表示クラス
コマンド show/hide でクラスを非表示にすることができます。
これは大規模なインクルードファイルを定義する場合で、ファイルのインクルードの後でいくつかのクラスを非表示にしたい場合に有用である可能性が有ります。
クラスの削除
コマンド remove でクラスを削除することができます。
これは大規模なインクルードファイルを定義する場合で、ファイルのインクルードの後でいくつかのクラスを削除したい場合に有用である可能性が有ります。

タグ付き要素またはワイルドカードの非表示、削除、復元
$ を使用して要素にタグ($tags)を付けると、個別またはタグ単位でコンポーネントを削除、非表示、復元できます。
デフォルトでは、すべてのコンポーネントが表示されます:
hide $tag13でコンポーネントを非表示:
remove $tag13でコンポーネントを削除:

remove $tag13とrestore $tag1でコンポーネントを復元:
remove *とrestore $tag1でコンポーネントを復元:

孤立したクラスを非表示または削除する
デフォルトでは、すべてのクラスが表示されます:

- しかし、
hide @unlinkedで、孤立したクラスを非表示にすることができます:
- もしくは、
remove @unlinkedで、孤立したクラスを削除できます:
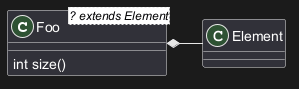
ジェネリクスの使用
括弧 < と > を使用してジェネリクスの使用をクラスに定義できます。
skinparam genericDisplay oldコマンドにより非表示にすることができます。
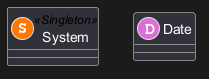
特殊な目印
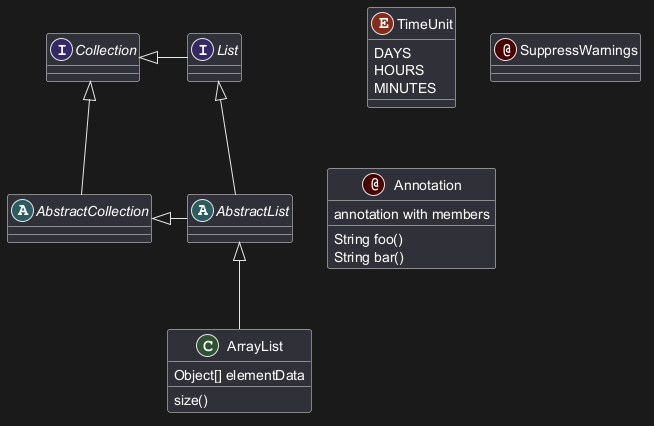
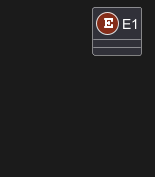
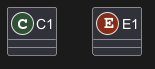
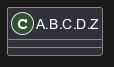
通常、目印文字 (C,I,E,A) は、クラス、インターフェイス、列挙型と抽象クラスのために使用されます。
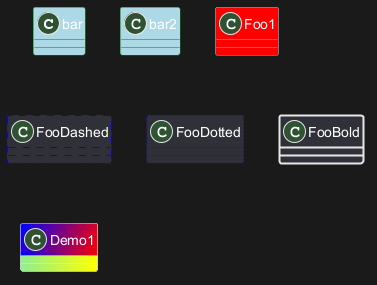
しかし、つぎの例のように単一の文字と色を追加し、ステレオタイプを定義するクラスに独自の目印を作成することができます:
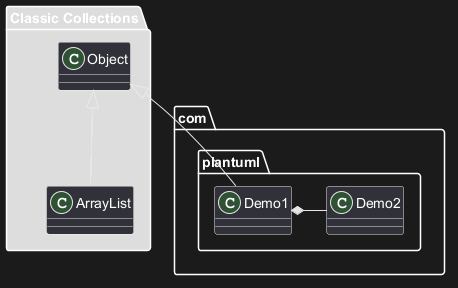
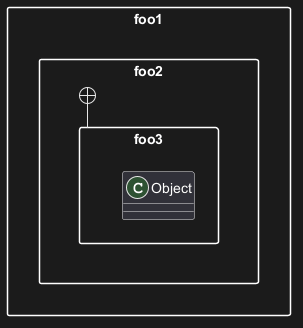
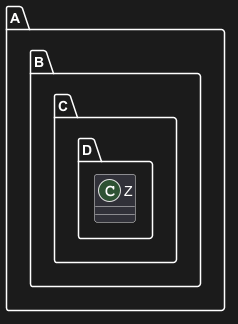
パッケージ
キーワード package を使用してパッケージを定義でき、必要に応じてパッケージの背景色(HTML カラーコードまたは名前)を宣言します。
パッケージ定義は入れ子にできることに注意してください。
WARNING
This translation need to be updated. WARNING
パッケージスタイル
パッケージに利用可能なさまざまなスタイルがあります。
コマンド skinparam packageStyle を使用してデフォルトのスタイルを設定する、またはパッケージのステレオタイプを使用する、のどちらかで指定することができます。
or by using a stereotype on the package:

名前空間
バージョン1.2023.2(ベータ版としてオンライン中)から、PlantUMLは名前空間とパッケージの扱いを変えます。
名前空間とパッケージの違いはもうありません:両方のキーワードは今や同義語です。
There won't be any difference between namespaces and packages anymore: both keywords are now synonymous.
WARNING
This translation need to be updated. WARNING
自動的にパッケージを作成する
コマンド set separator ??? を使用して、(ドット以外の)別の区切り文字を定義できます。

set separator none を使用して、自動的に名前空間を作成する機能を無効にできます。
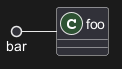
ロリポップ(棒付きキャンディー)インタフェース
次の構文を使用して、クラスにロリポップインタフェースを定義することもできます:
bar ()- foobar ()-- foofoo -() bar
矢印の向きを変える
デフォルトではクラス間のリンクは 2 つのダッシュ -- を持っており、垂直に配向されています。
次のように単一のダッシュ(またはドット)を置くことによって水平方向にリンクを使用することが可能です。
left, right, up, down を矢印の内側に置くことにより、矢印の方向を変えることも可能です:
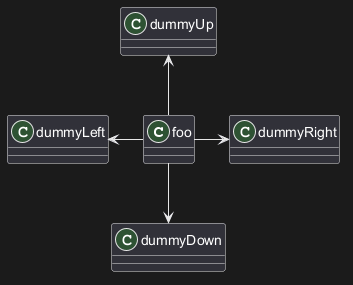
-d- を -down- の代わりに、または、最初の 2 文字
(-do-)。
この機能を悪用してはならないことに注意してください。Graphviz は微調整のいらない良い結果を通常は与えてくれます。
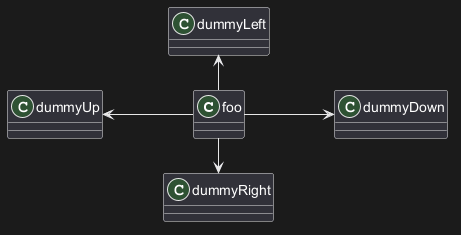
left to right directionパラメータを使用した場合は次のようになります。
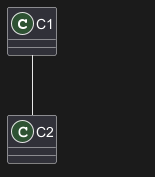
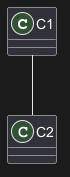
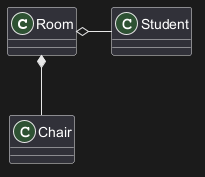
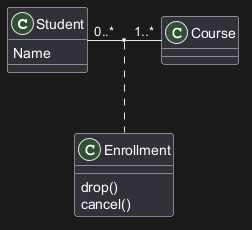
関連クラス
この例のように、2 つのクラスの関係を定義した後で 関連クラス を定義することができます。

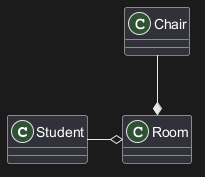
同一クラスに複数の関連
化粧をする
ダイアグラムの色やフォントを変更するには skinparam コマンドを使用します。
このコマンドは以下の場面で使用できます。
- ダイアグラム定義内で他のコマンドを同様に。
- インクルードされたファイル内。
- 設定ファイルのコマンドライン内やAntタスク内。
ステレオタイプの化粧
ステレオタイプクラスに特定の色やフォントを定義することができます。
- `BackgroundColor_<<Foo>> Wheat`
- `skinparam stereotypeCBackgroundColor_<<Foo>> DimGray`
WARNING
This translation need to be updated. WARNING
色のグラデーション
# 表記を使用して、クラスや注釈に個別の色を宣言することが可能です。
標準的な色の名前または RGB コードのいずれかを様々な記法で使用することができます。色を参照してください。
次の構文で背景に色のグラデーションを設定することもできます。
2つの色の名前を次のいずれかで区切って記述してください:
|/\-
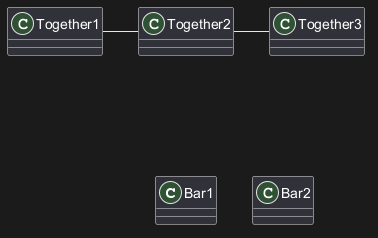
レイアウトの手助け
ときには、デフォルトのレイアウトでは完璧とは言えないことがあります…
togetherキーワードを使って複数のクラスをグループにまとめることができます:
レイアウトエンジンは、それらのクラスを(あたかも同じパッケージにあるかのように)グループにまとめようとします。
hiddenリンクを使ってレイアウトを強制することも可能です。
大きなファイルの分割
時には、ある非常に大きな画像ファイルを受け取ることがあるでしょう。
生成された画像を複数のファイルに分割するコマンド page (hpages)x(vpages) を使用することができます:
hpages は横方向のページ数を示すコマンドであり、
そして vpages は縦方向のページ数を示すコマンドです。
特定のスキンパラメータ設定を使用して、分割されたページに罫線を配置することもできます(例を参照)。
継承(extends)と実装(implements)
extendsキーワードとimplementsキーワードを使用することができます。
WARNING
This translation need to be updated. WARNING
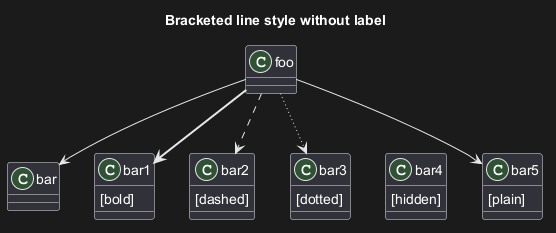
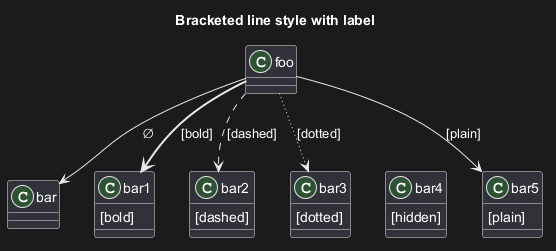
角括弧を使用した関係(リンク、矢印)のスタイル
線のスタイル
関係(リンク、矢印)にbold、dashed、dotted、hidden、plainのスタイルを指定することができます。- ラベル無し
- ラベル有り
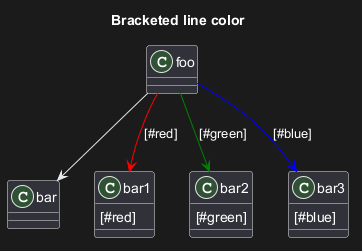
線の色
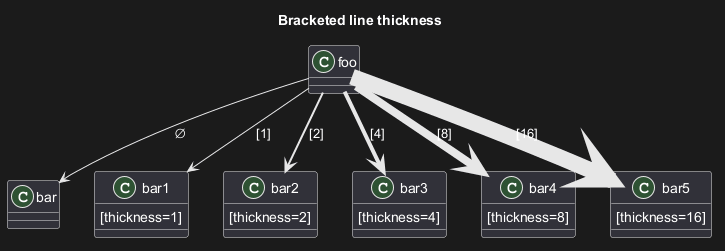
線の太さ
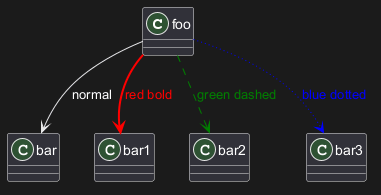
混合

関係(リンク、矢印)の色とスタイルを変更する(インラインスタイル)
個別の関係ごとに色とスタイルを変更するには、次の記法を使用します:
#color;line.[bold|dashed|dotted];text:color
クラスの色とスタイルを変更する(インラインスタイル)
個別のクラスごとに色とスタイルを変更するには、次の記法を使用します:
#color ##[style]color
#color)、次に線の色(##[style]color)を指定します。
#[color|back:color];header:color;line:color;line.[bold|dashed|dotted];text:color
クラスメンバ間の矢印
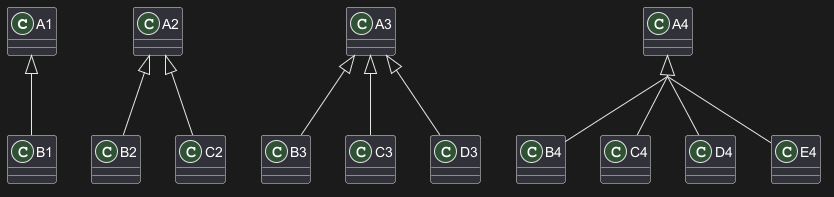
継承の矢印のグループ化
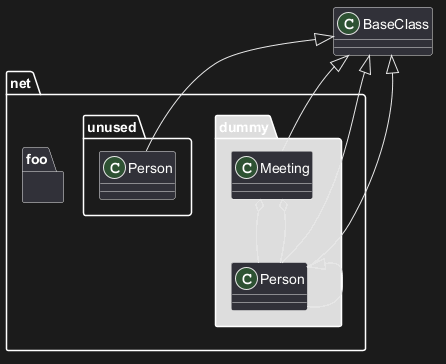
skinparam groupInheritanceを使用すると、複数の矢印の矢じりを統合することができます。また、閾値をパラメータとして指定できます。
groupInheritance 1 (グループ化しない)
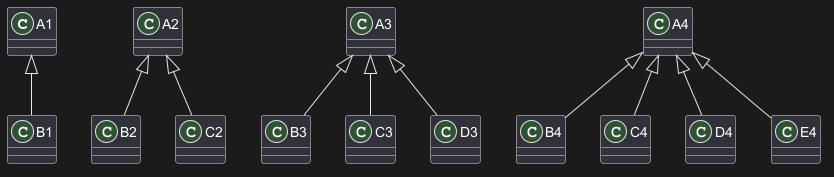
groupInheritance 2 (2つ以上の場合にグループ化)
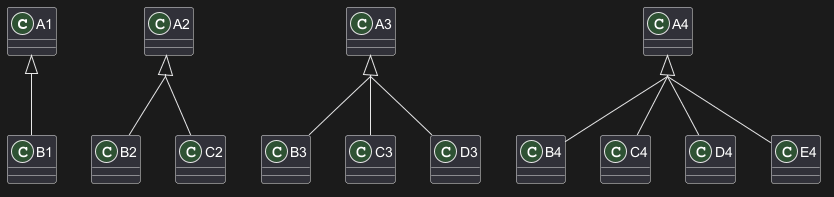
groupInheritance 3 (3つ以上の場合にグループ化)
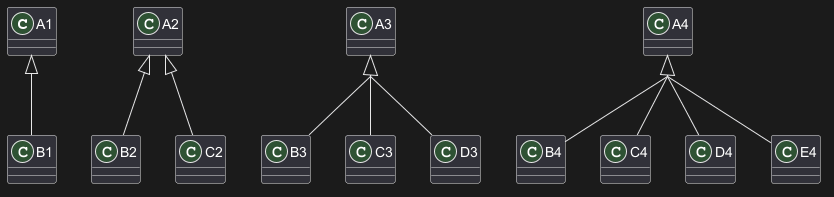
groupInheritance 4 (4つ以上の場合にグループ化)
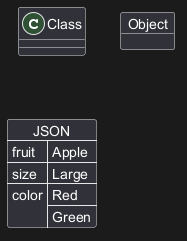
Display JSON Data on Class or Object diagram
Simple example
Packages and Namespaces Enhancement
[From V1.2023.2+, and V1.2023.5]


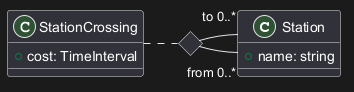
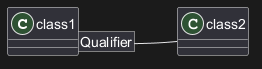
Qualified associations
Minimal example
Another example
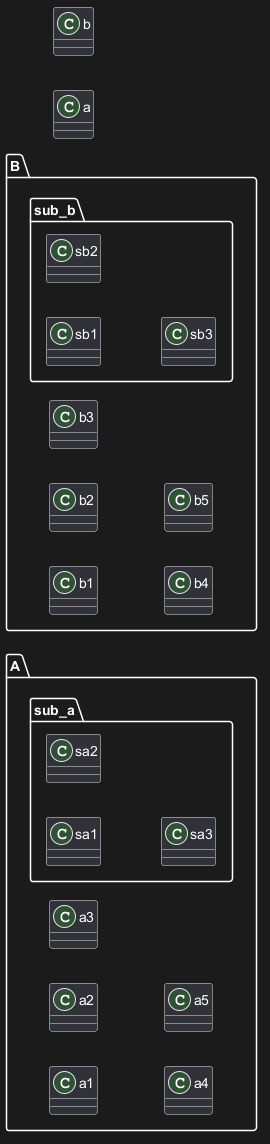
Change diagram orientation
You can change (whole) diagram orientation with:
top to bottom direction(by default)left to right direction
Top to bottom (by default)
With Graphviz (layout engine by default)
The main rule is: Nested element first, then simple element.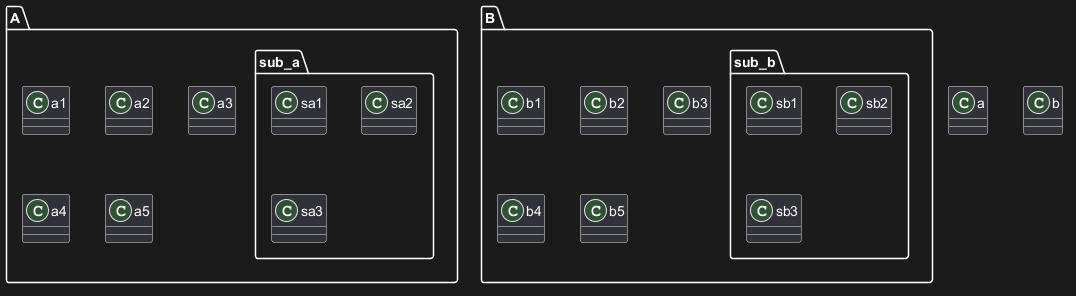
With Smetana (internal layout engine)
The main rule is the opposite: Simple element first, then nested element.
Left to right
With Graphviz (layout engine by default)
With Smetana (internal layout engine)

Role label to associations
